
Free Packing Software Tutorial
PackerMaster is a professional container loading optimization tool designed for export factories, freight forwarders, and logistics professionals. This tutorial provides a step-by-step guide on how to use this free packing calculator to quickly create optimized loading plans for 20GP, 40GP, 40HQ, and custom containers.
Software Overview
PackerMaster is built for manufacturers, retailers, 3PLs, and freight forwarders to solve planning pain points in logistics operations. With flexible loading rules and powerful algorithms, it provides optimal loading solutions to reduce container usage costs and improve planning efficiency. The software covers multiple industries including daily retail, auto parts, furniture & building materials, instrumentation, and textiles, supporting road, rail, sea, and air transport modes in one integrated solution.
- Flexible loading modes: mixed cargo direct loading, single-cargo quick loading, pallet-only, and pallet-then-load
- Multiple container types: 20GP, 40GP, 40HQ, 45HQ and custom-sized containers
- Smart pallet configuration: standard pallets and custom pallets
- 6 professional packing algorithms for different scenarios
- 3D visualization for intuitive loading preview
- Safety checks: center-of-gravity control and weight distribution
- Multiple export formats: online 3D sharing, PDF step-by-step reports, Excel packing reports, etc.
This software is ideal for logistics companies, manufacturers, e-commerce businesses, and foreign trade enterprises that frequently need container loading calculations.




Quick Start
Follow these steps to quickly complete your container loading calculation:
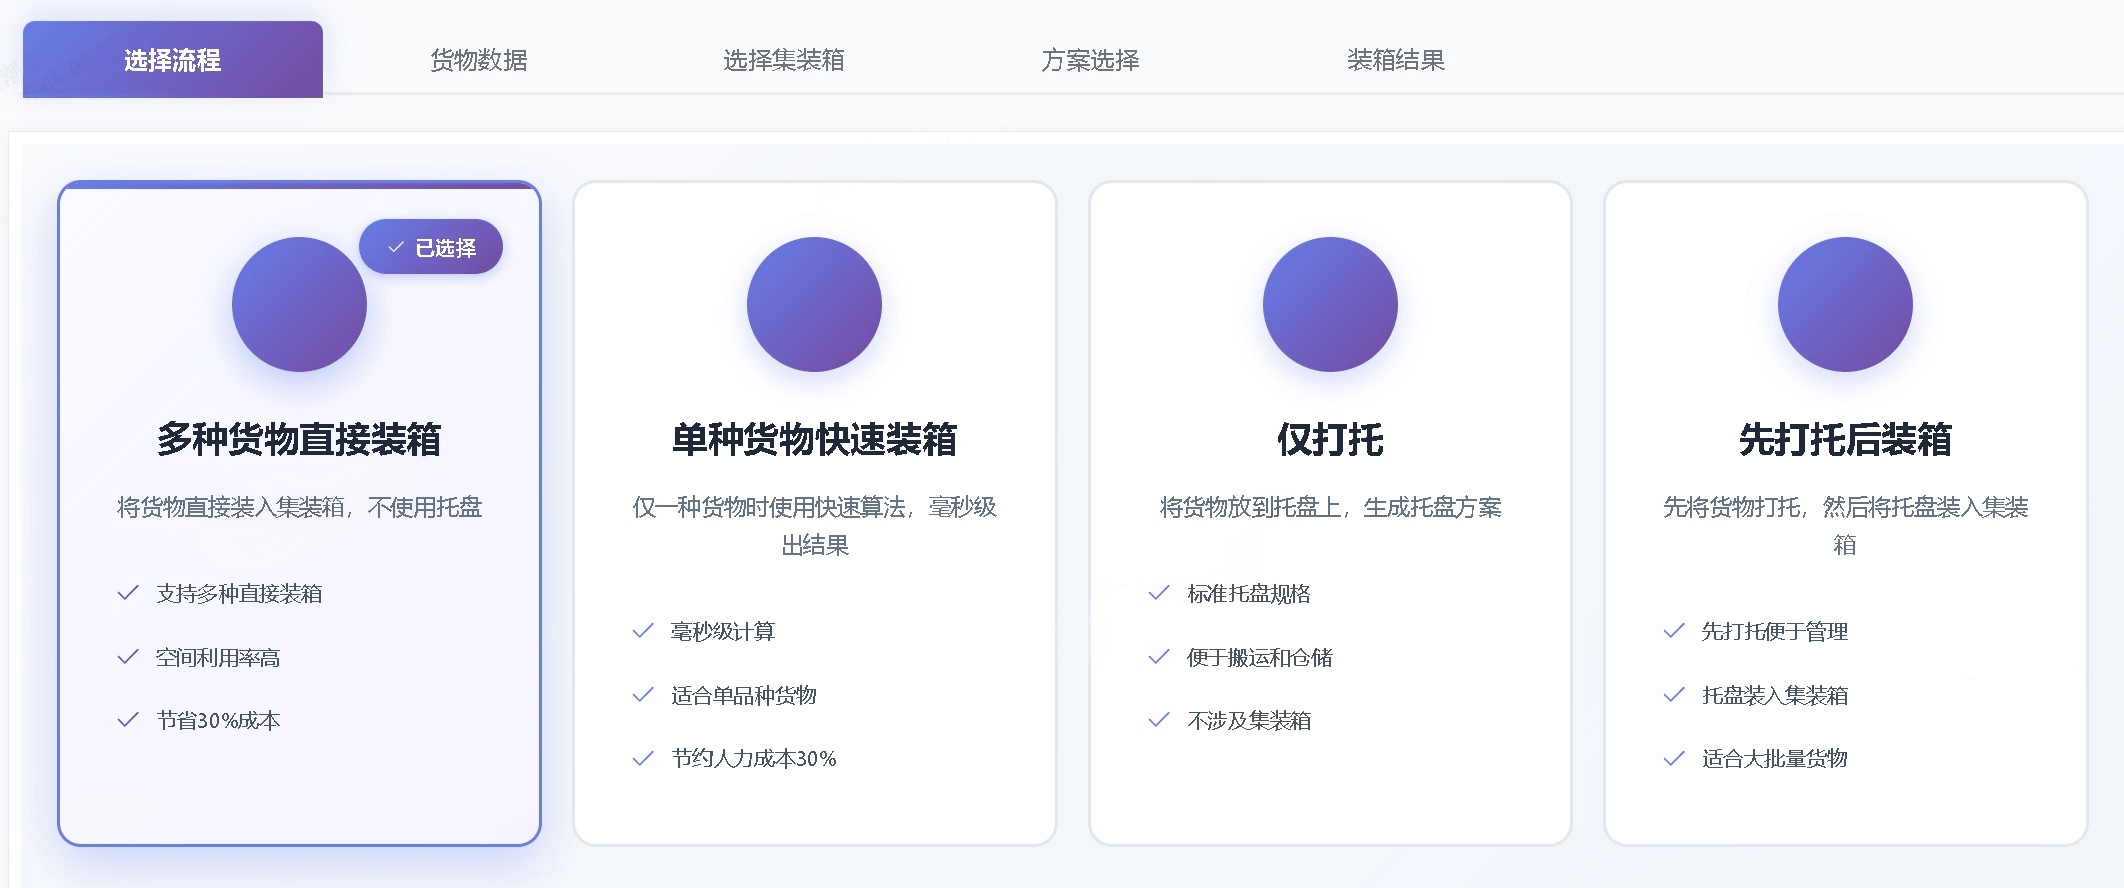
Select Workflow
Choose from "Mixed Cargo Direct Loading"、"Single-Cargo Quick Loading"、"Pallet Only" or "Pallet then Load"
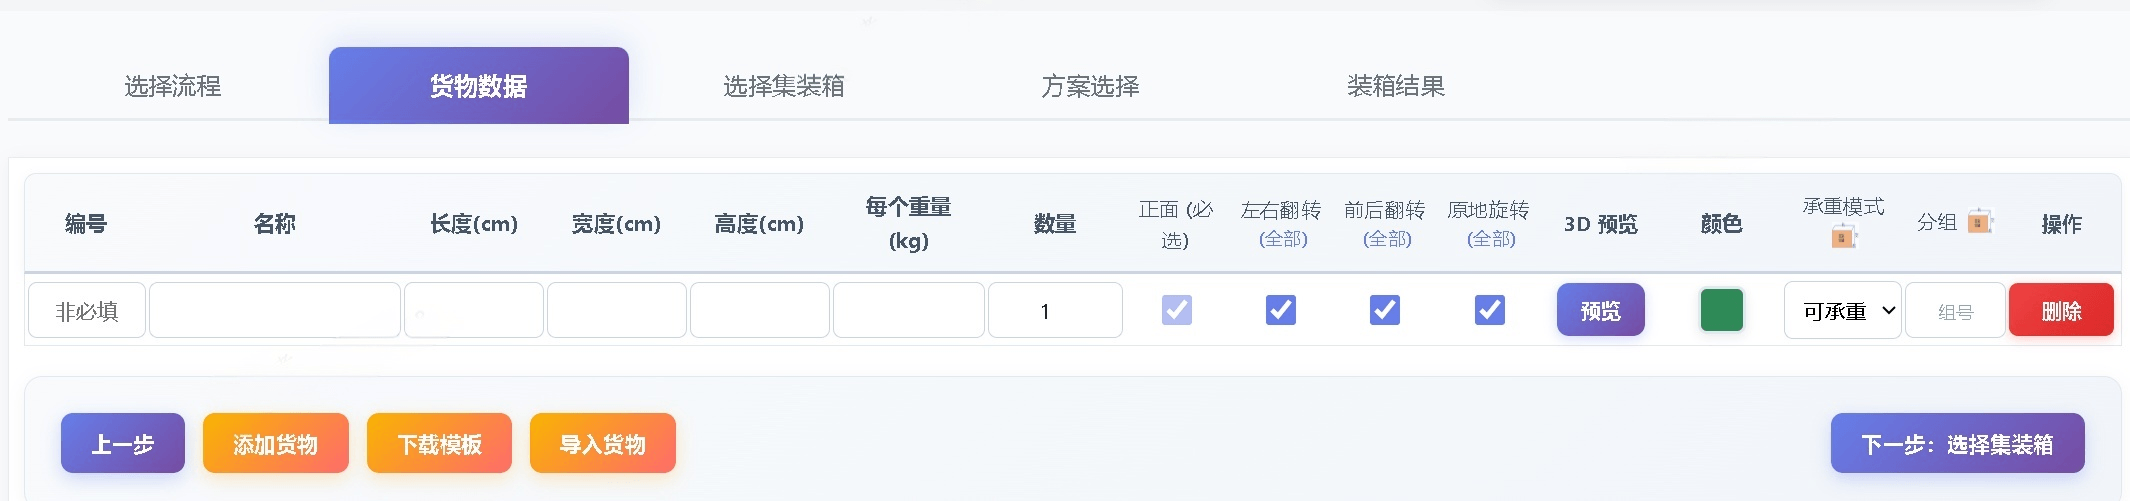
Enter Cargo Data
Use template import or manual entry for cargo name, ID, length, width, height, weight, quantity, load-bearing mode, group, rotation options, etc.
Select Container Type
Choose a standard container or custom size (container dimensions can be modified) — the container here can be any container, not necessarily a shipping container
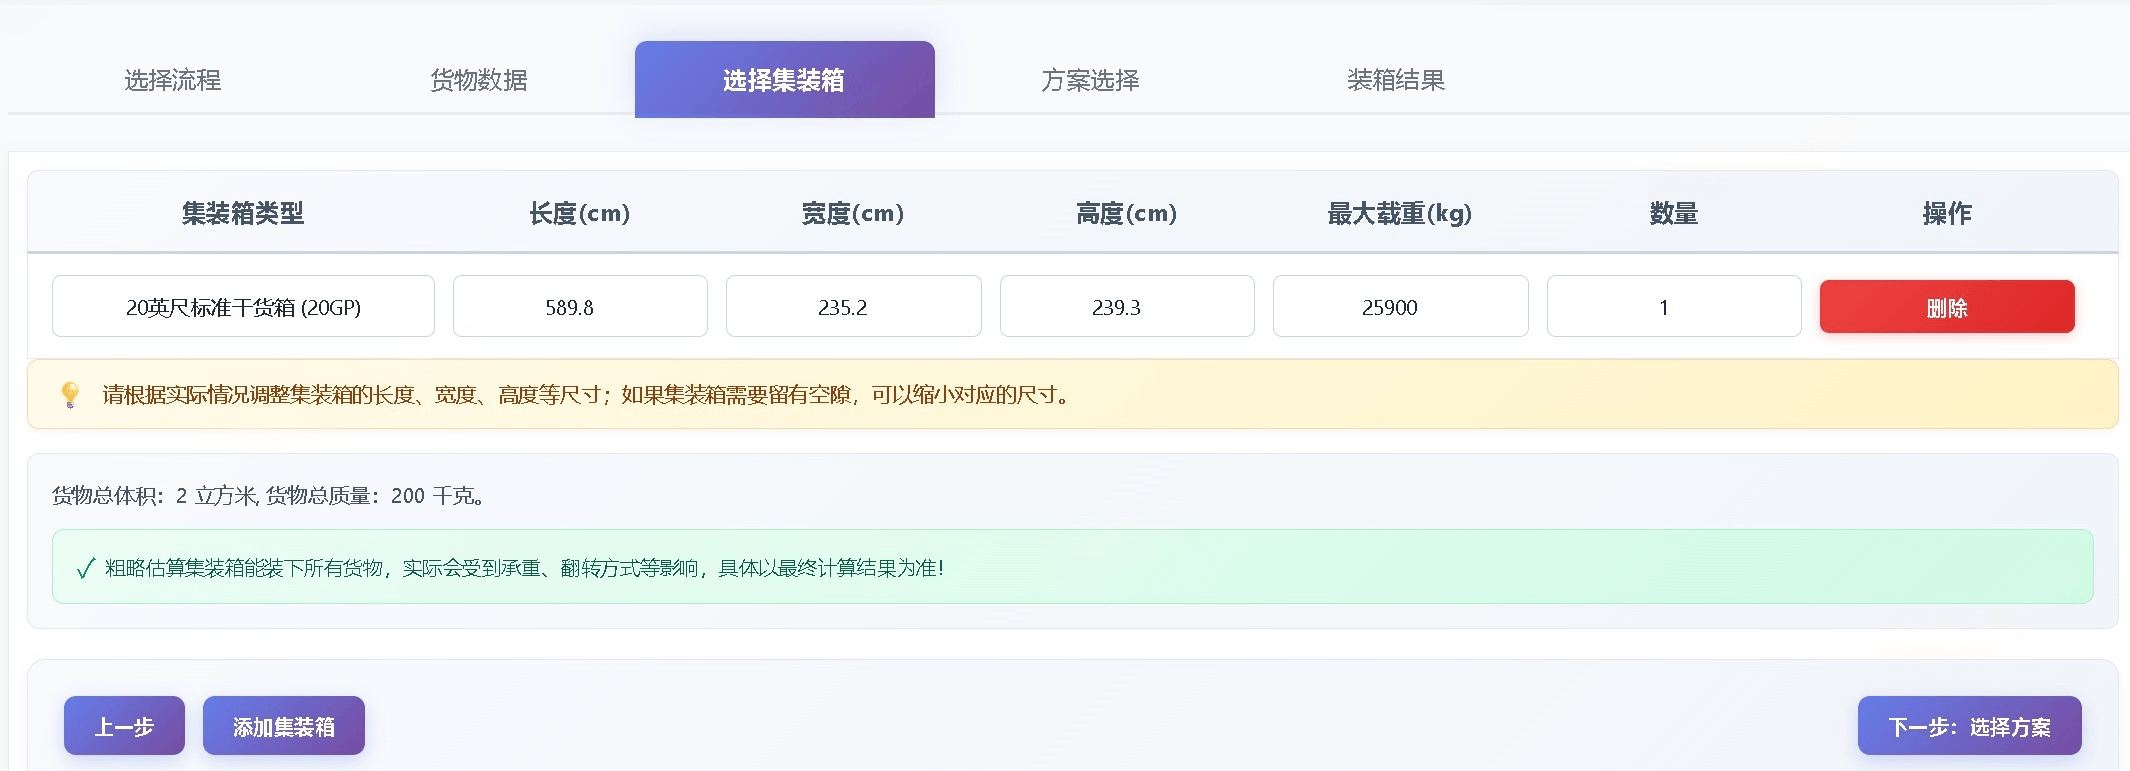
Select Packing Plan
Choose cargo loading order, container usage order, cargo placement orientation, etc.
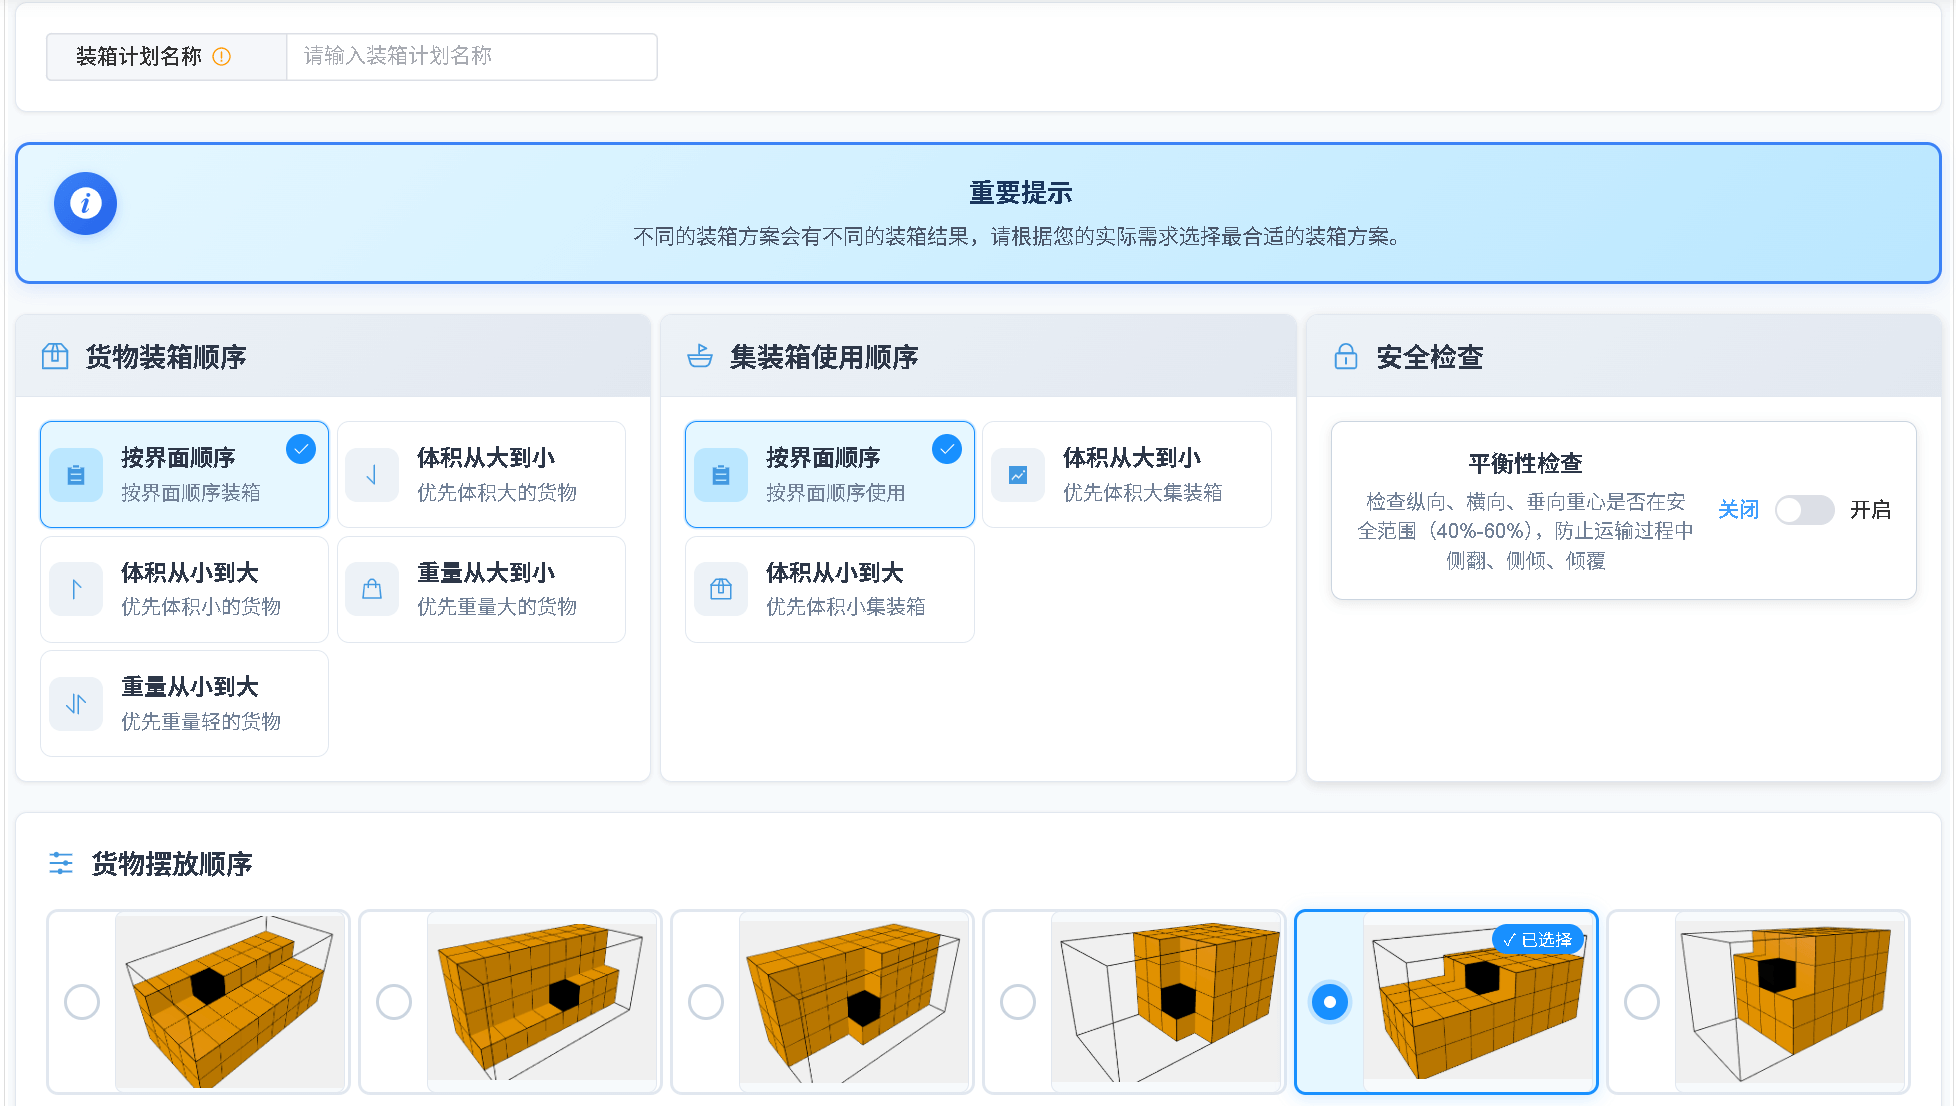
View Packing Results
Displays container usage, cargo loading status, 3D view, etc.
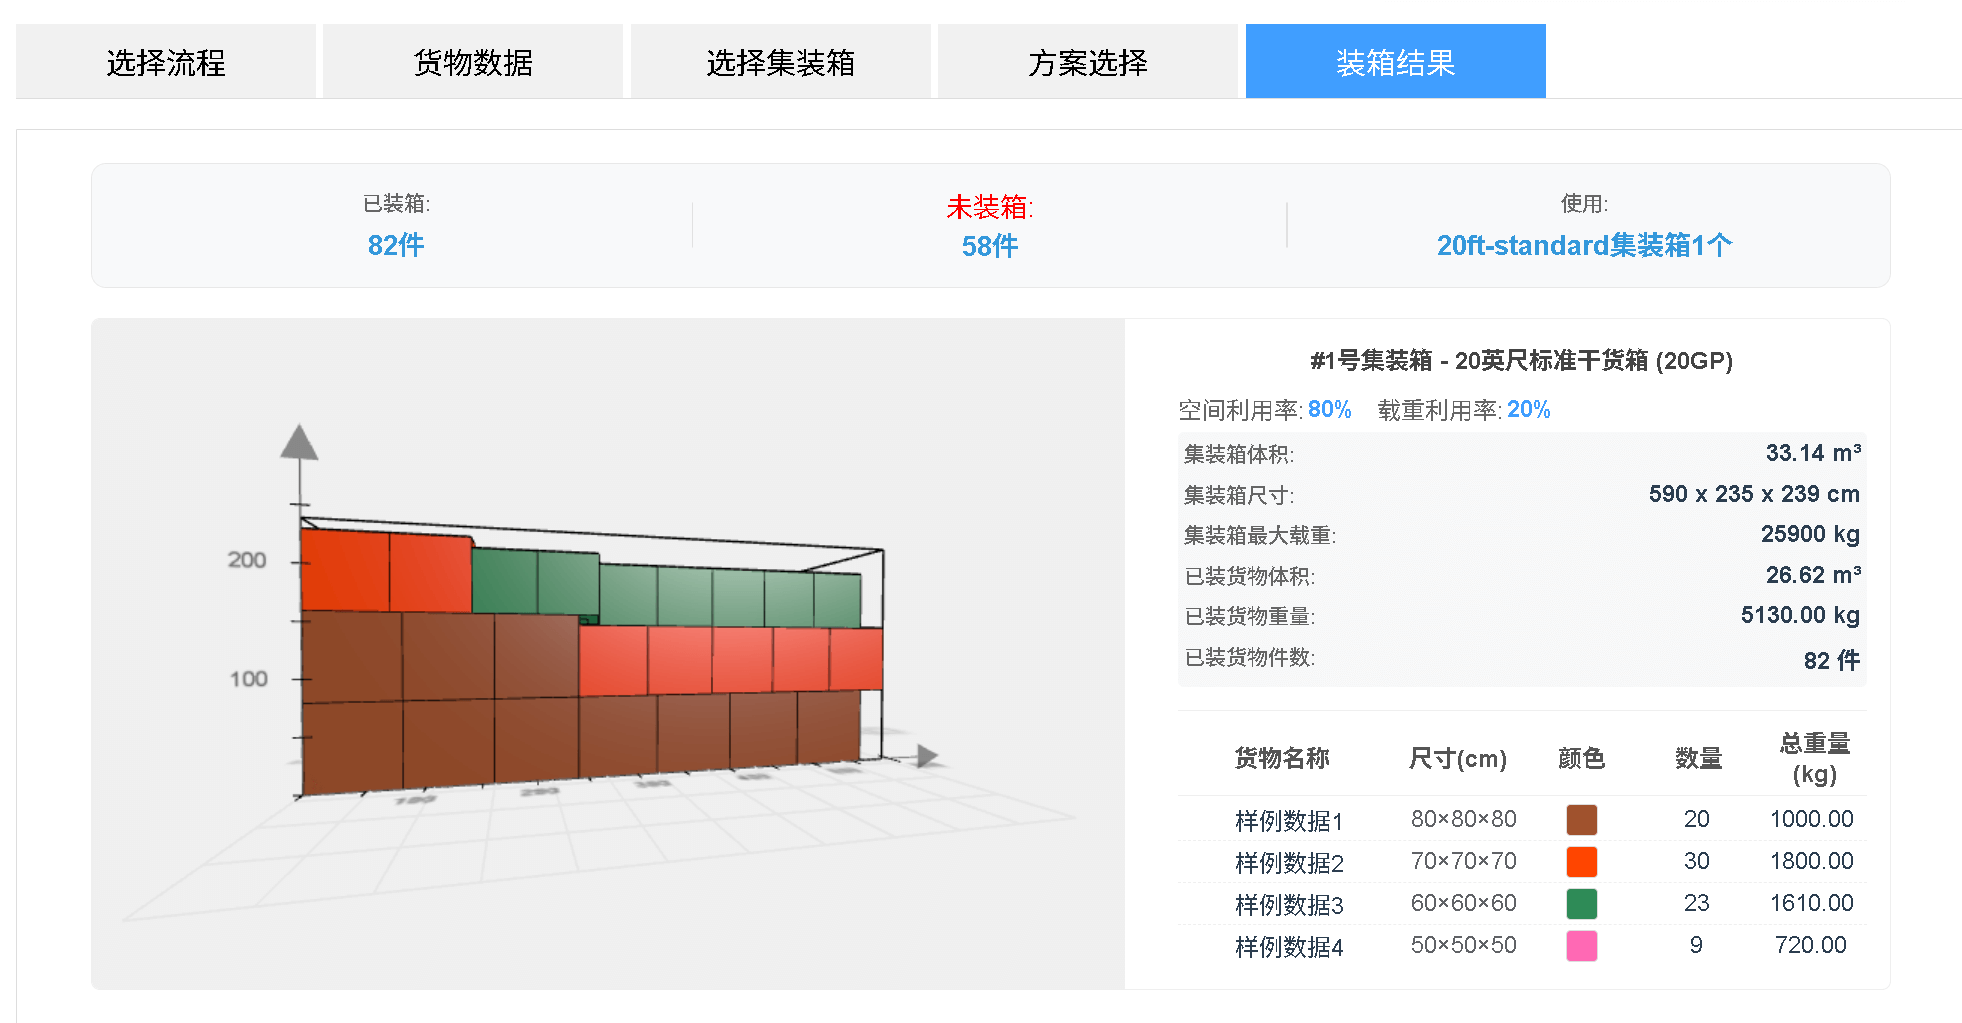
View Detailed Packing Info
Inspect cargo loading order, container usage, placement orientation, etc.
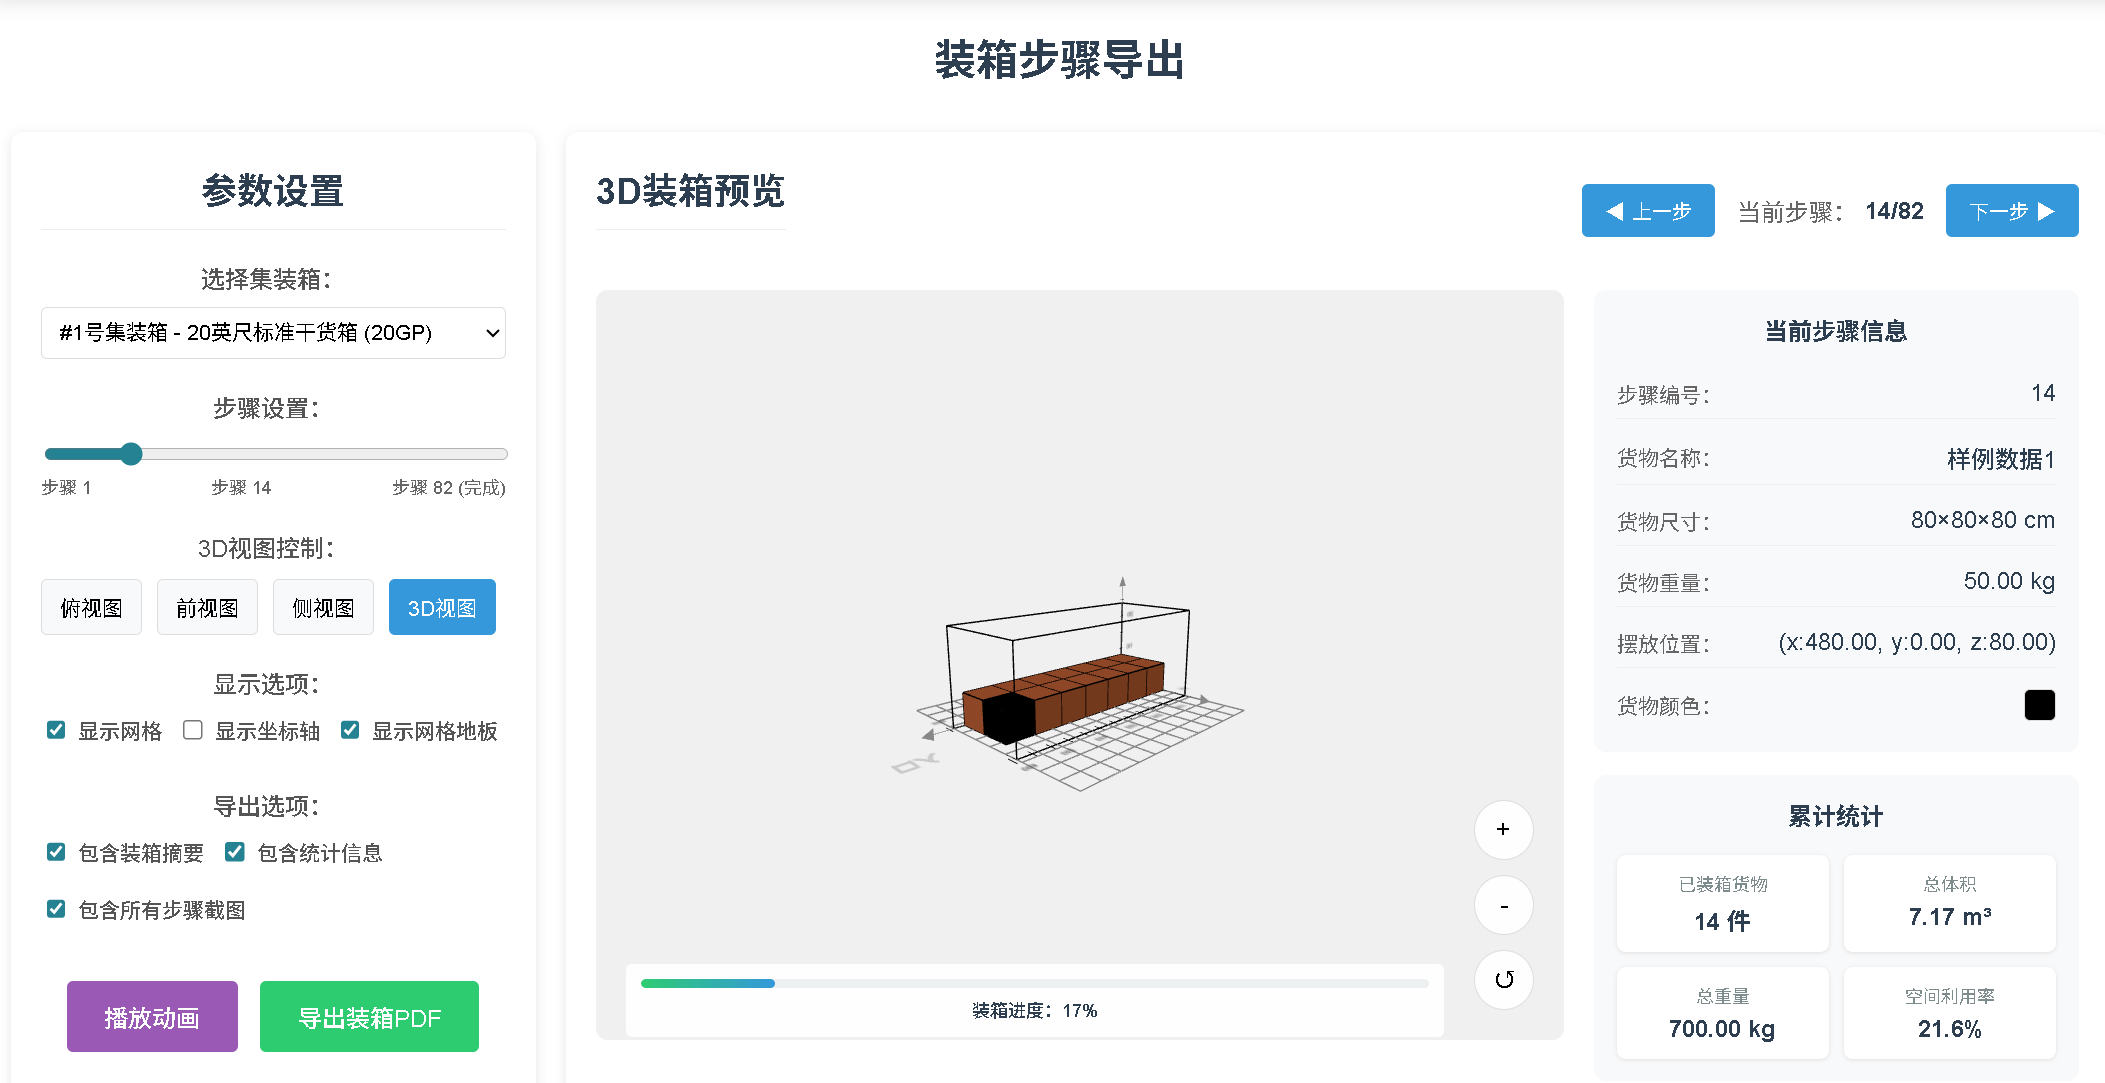
View Packing Steps
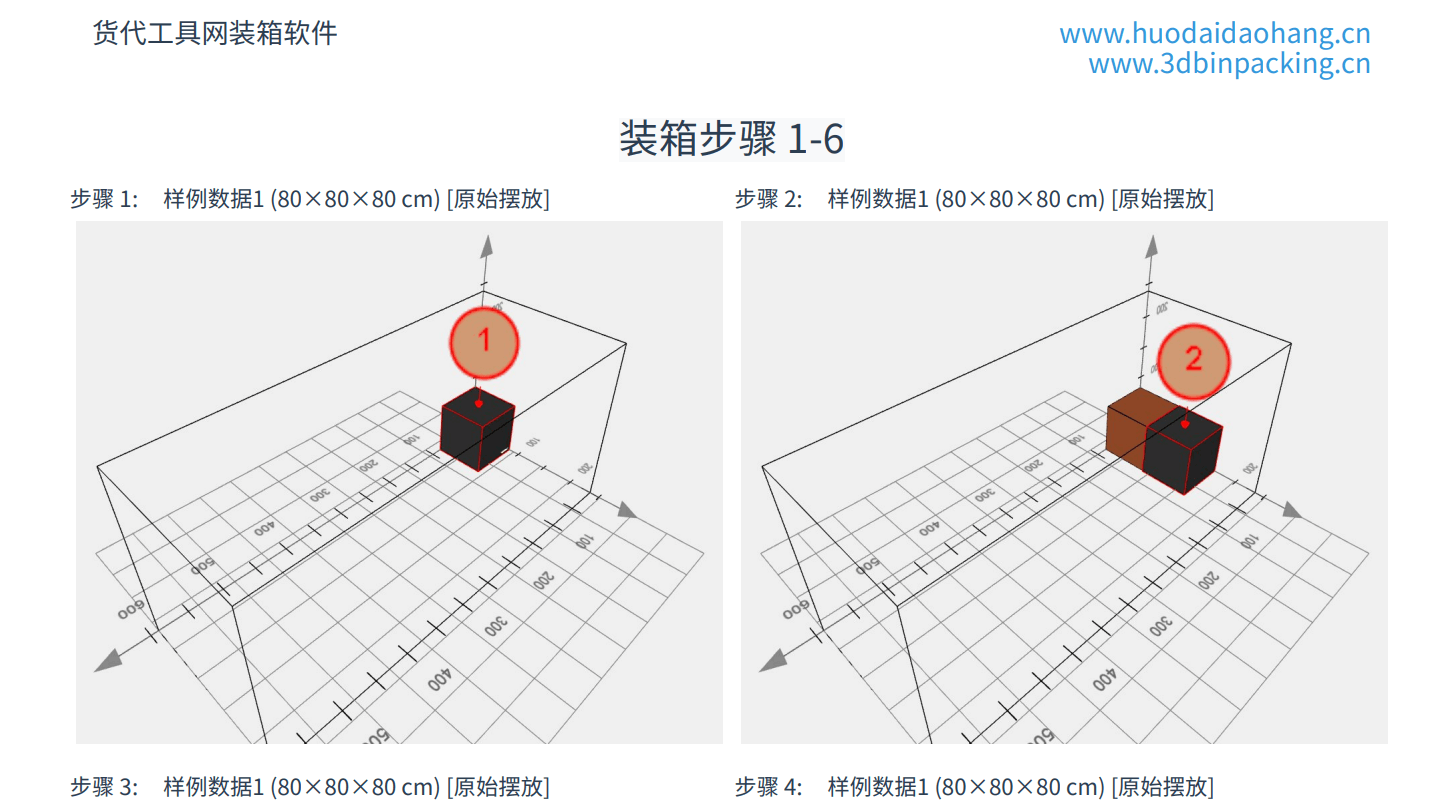
Export PDF with step-by-step instructions for each loading action
First-time users are recommended to start with "Direct Loading Mode" to get familiar with the basic operations before trying other modes.
Basic Concepts
Cargo Dimensions
Cargo dimensions refer to the smallest rectangular (cuboid) physical size of the outer package, including length, width, and height. When measuring, the cargo is placed on the ground in its normal orientation:
- Length: The long side in contact with the ground when the cargo is placed normally (or the wide side)
- Width: The wide side in contact with the ground when the cargo is placed normally (or the long side)
- Height: The vertical side perpendicular to the ground
Units: dimensions support centimeters (CM), millimeters (MM), feet, and inches; weight supports kilograms (kg) and pounds. These can be configured in the cargo template or directly in the software interface.
Examples
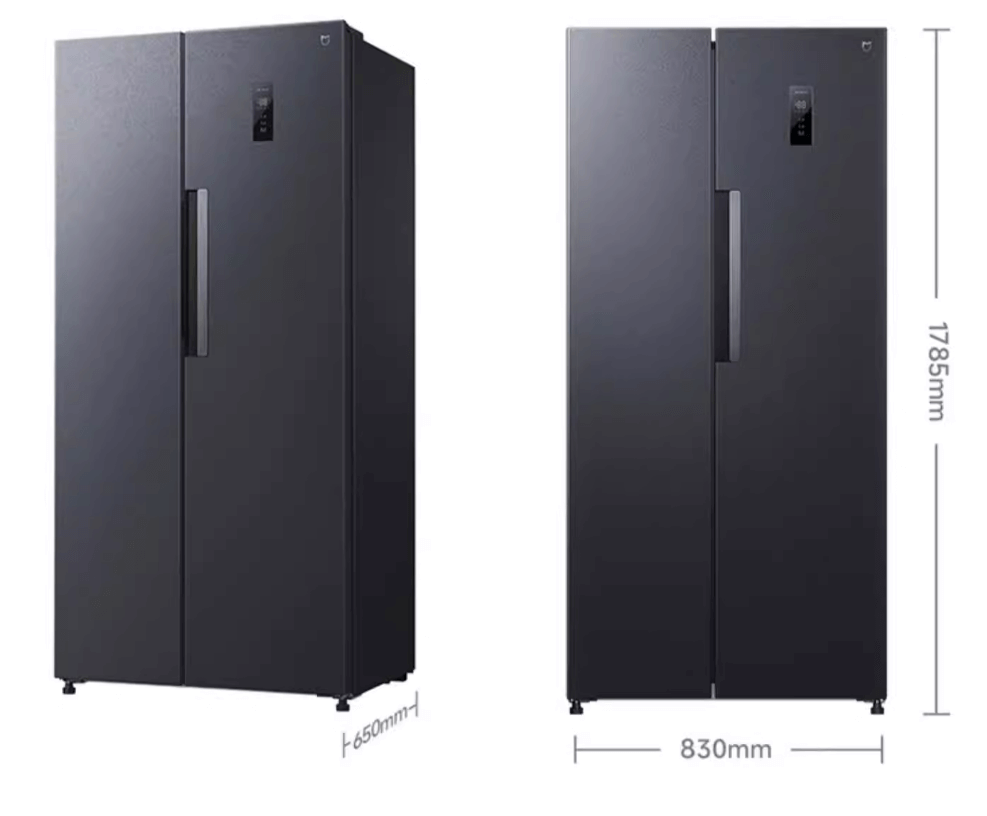
1. Household Refrigerator
A refrigerator is normally placed upright. Dimensions are as shown:
Length: 83cm (side in contact with ground)
Width: 63cm (side in contact with ground)
Height: 178.5cm (vertical side)
2. Chest Freezer
A chest freezer is normally placed horizontally. Dimensions are as shown:
Length: 130.1cm (side in contact with ground)
Width: 63.5cm (side in contact with ground)
Height: 85cm (vertical side)

Cargo can be rotated during actual loading. For example, a refrigerator can be laid horizontally inside a container. Enable the "Allow Rotation" option for each cargo to let the system automatically find the best orientation for optimal packing.
Container Dimensions
Standard container dimensions are as follows (can be manually adjusted or custom-sized to meet actual needs):
| Type | Length (cm) | Width (cm) | Height (cm) | Max Payload (kg) |
|---|---|---|---|---|
| 20GP | 589 | 235 | 239 | 28200 |
| 40GP | 1200 | 235 | 239 | 26630 |
| 40HQ | 1200 | 235 | 269 | 26630 |
| 45HQ | 1355 | 235 | 269 | 26000 |
Space Utilization
Space utilization is the percentage of container volume occupied by cargo, calculated as:
Space Utilization = (Total Cargo Volume / Container Volume) × 100%
Higher space utilization means more efficient use of container space.
Weight Utilization
Weight utilization is the percentage of container payload used, calculated as:
Weight Utilization = (Total Cargo Weight / Container Payload) × 100%
Higher weight utilization means more efficient use of the container's weight capacity.
Single-Cargo Quick Loading Mode
When all cargo items share the same dimensions, this mode provides fast, simple, and efficient loading.
Use Cases
- Only one type of cargo to handle
- Pre-packaged boxes or cartons
- Goods that need to be distributed evenly for easy access
- Simple placement rules with uniform cargo type
Mixed Cargo Direct Loading
The most common loading method, loading directly into containers. Items can be pre-palletized or individually packaged, typically in rectangular or cuboid shapes.
Use Cases
- Multiple cargo types
- Pre-packaged boxes or cartons
- Goods that need to be distributed evenly
- Simple placement rules with multiple types
Single-Cargo Quantity Calculator
This mode quickly calculates how many identical items fit into a single container, ideal for quick estimates.
Use Cases
- Only one type of cargo to load
- Quickly calculate maximum loading quantity
- Compare loading efficiency across different container types
- Pre-estimate container requirements
Pallet-Only Mode
Generate palletizing plans by loading cargo onto specified pallets.
Use Cases
- Regular-shaped boxed/bagged cargo
- Heavy, large, or hard-to-handle cargo
- Fragile, precision, or high-value items
- Goods requiring moisture or special protection
- Export ocean freight shipments
- Air freight shipments
- Warehouse/distribution center deliveries
Pallet then Load Mode
First palletize the cargo, then load the pallets into the selected containers.
Use Cases
- Regular-shaped boxed/bagged cargo
- Heavy, large, or hard-to-handle cargo
- Fragile, precision, or high-value items
- Goods requiring moisture or special protection
- Export ocean freight shipments
- Air freight shipments
- Warehouse/distribution center deliveries
Pallet-Only Mode
This mode loads cargo onto pallets to create standardized pallet units for palletized transport.
Use Cases
- Cargo requires palletized transport
- Need standardized units for warehouse management
- Small items suitable for batch palletizing
- Forklift operations required
Palletizing Process
- Enter cargo data
- Select pallet type (standard or custom)
- Configure pallet parameters (max height, stacking layers, etc.)
- Select cargo placement method
- Run palletizing calculation
- View pallet loading results and export
Pallet Placement Options
- By entry order: Load in the order items were added
- By volume (largest first): Prioritize large-volume items
- By weight (heaviest first): Prioritize heavy items
- By LWH sort: Sort by length, width, height
- By LWH reverse: Sort in reverse order
Pallet then Load Mode
This is the complete transport workflow: first load cargo onto pallets, then load the pallets into containers.
Use Cases
- Palletized transport with long-distance container shipping
- Goods requiring secondary distribution (warehouse to store)
- Need to improve handling efficiency and cargo safety
- Need standardized operating procedures
Workflow
- Configure pallet parameters: Select pallet type and set parameters
- Configure palletizing options: Choose cargo placement on pallets
- Configure loading options: Choose pallet placement inside containers
- Select packing plan: Choose the appropriate packing algorithm
- Start calculation: System palletizes first, then loads
- View results: Inspect 3D view of pallets and cargo
Pallet Loading Options
- Pallet rotation: Allow pallets to rotate 90° inside the container
- Pallet order: Sort by volume, weight, or entry order
- Safety checks: Center-of-gravity and weight distribution
- Complete transport workflow management
- Standardized pallet units
- Optimized container loading plans
- Supports multiple container types
- Detailed 3D display and reports
Loose Cargo Support (No-Pallet)
In Pallet-then-Load mode, the cargo table now has a "Palletize" checkbox per row (checked by default). When unchecked, that cargo skips palletizing and is loaded directly as loose cargo into the container, filling the leftover gaps between pallets and between pallets and the container walls to further improve utilization.
- Oversize / irregular items: cargo larger than the pallet or with irregular shapes that pallets cannot accommodate
- Small leftover items: items too few to fill a pallet — mixed as loose cargo saves pallet space
The algorithm automatically guarantees that loose cargo never overlaps with pallets or other loose cargo, and never exceeds the container walls — any spatial conflict is detected and blocked.
Note: If every cargo is marked "No Pallet", the algorithm cannot run; the UI will prompt you to keep at least one cargo palletized.

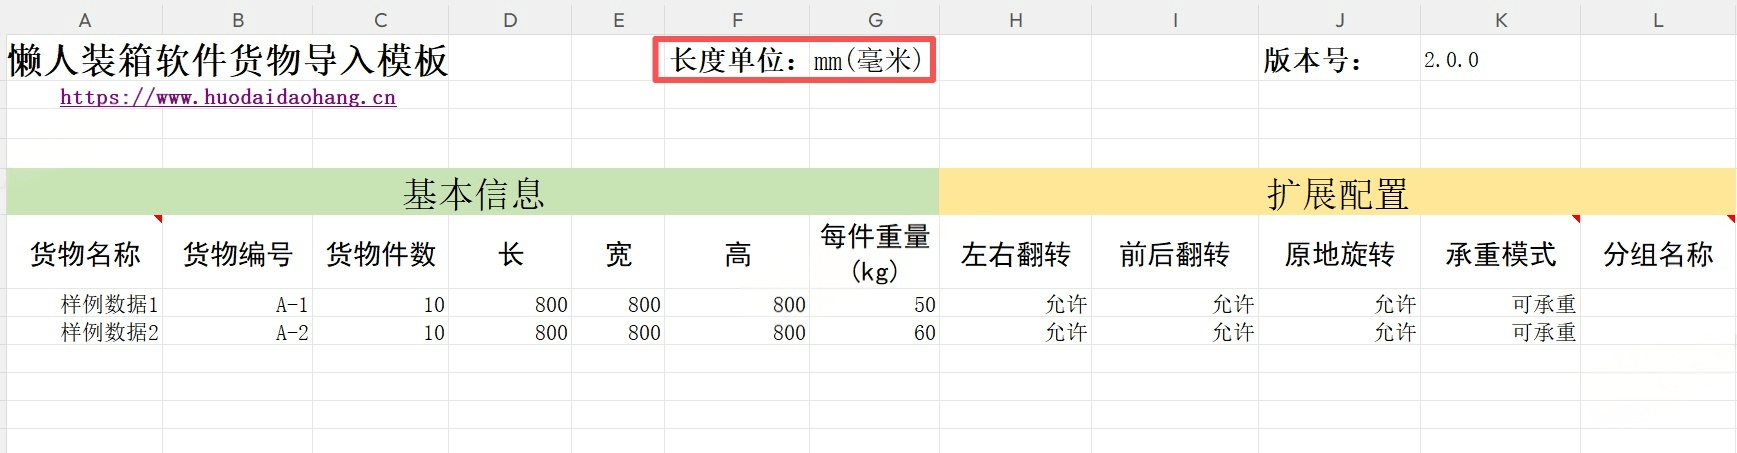
Cargo Import Template
# The template allows units in centimeters (cm) or millimeters (mm). Please select the correct unit and enter the actual dimensions accordingly.
# Columns: Cargo ID, Cargo Name, Quantity, Length, Width, Height, Weight per piece (kg), Load-bearing mode, Group ID — do NOT change these headers, otherwise data cannot be read.
# Cargo names must be unique; otherwise, the system cannot distinguish which items are actually loaded. For multiple pieces of the same cargo, enter one row and adjust the quantity.
# Each row must be complete — do not leave half-filled rows.
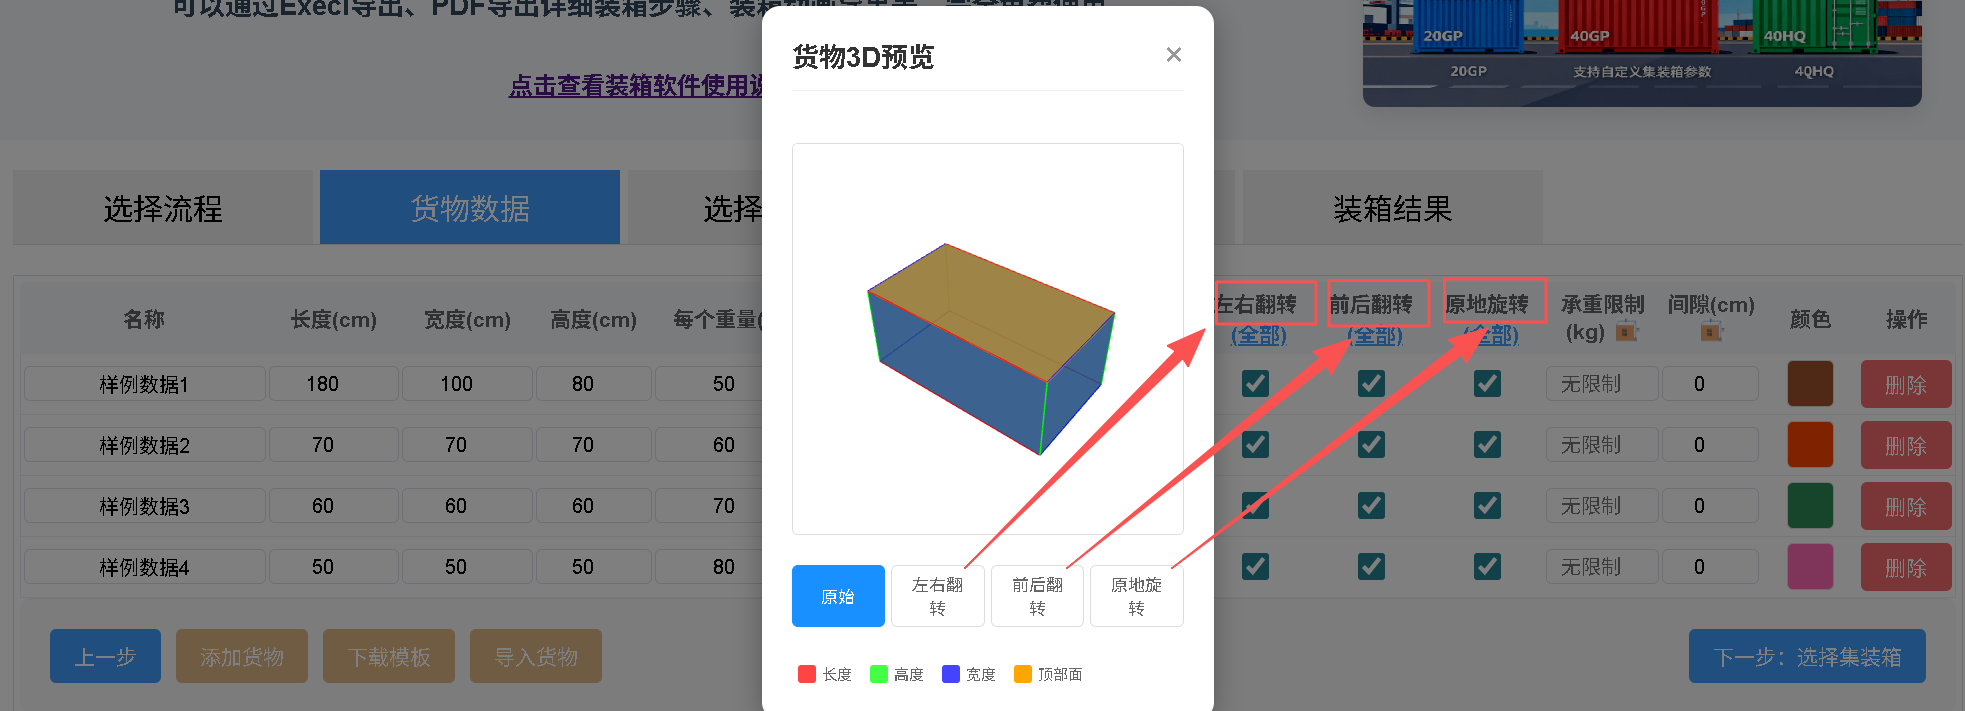
Cargo 3D Flip Preview
Preview cargo orientation: left-right flip, front-back flip, and in-place rotation. For example, liquid cargo should not be flipped left-right or front-back — uncheck those options accordingly.
Load-Bearing Modes
Three load-bearing modes are supported:
Load-Bearing: This item can support any other cargo on top.
Non Load-Bearing: This item cannot support any cargo on top.
Same-Only Stacking: This item can only support identical cargo (same name, same row).
Cargo Gap
In addition to the container-level gap, a gap can also be set for each cargo item individually. On the cargo input page, click the "Gap" button (⛶) in a cargo row to open the "Cargo Clearance Settings" dialog, where you can set the clearance for all six directions — Front, Back, Left, Right, Top and Bottom (0 = no gap, all default to 0), in the same unit as the cargo dimensions (cm or inch).
The gap is the minimum spacing to be kept around the cargo: once set, the item automatically keeps the specified distance from other cargo and from the container walls:
- Front/Back: along the container length direction (X axis) — ideal for reserving forklift entry and door-side working space
- Left/Right: along the container width direction (Z axis) — ideal for preventing adjacent cargo from squeezing and leaving handling space
- Top/Bottom: along the container height direction (Y axis) — ideal for top protection and bottom moisture/ventilation spacing

Cargo Gap vs. Container Gap
Common Use Cases
- Fragile / collision-sensitive cargo: keep buffer spacing around the item to avoid direct squeezing from adjacent cargo;
- Forklift handling: reserve forklift entry and movement space in the front/back (or left/right) directions;
- Ventilation / moisture protection: leave a bottom gap for air circulation so cargo does not touch the container floor directly;
- Mixed-load protection: set a larger gap for precision equipment only, while keeping other cargo at 0 to maximize space utilization.
The sum of two opposite-side gaps must not exceed the corresponding cargo dimension; otherwise a "Gap too large" warning appears and the settings cannot be saved. Overly large gaps significantly reduce space utilization — set them only based on actual handling needs, and keep the default 0 for cargo with no special requirements.
Grouping Function
Purpose:
• Assign different cargo items to the same group (enter the same group name)
• The packing algorithm will prioritize placing grouped items into the same container
Example:
• Set all items for "Customer A" to group "Customer A"
• The algorithm will try to keep Customer A's items together in one container
Other Settings
# Color: Assign colors to distinguish different cargo types in the 3D view and PDF step reports.
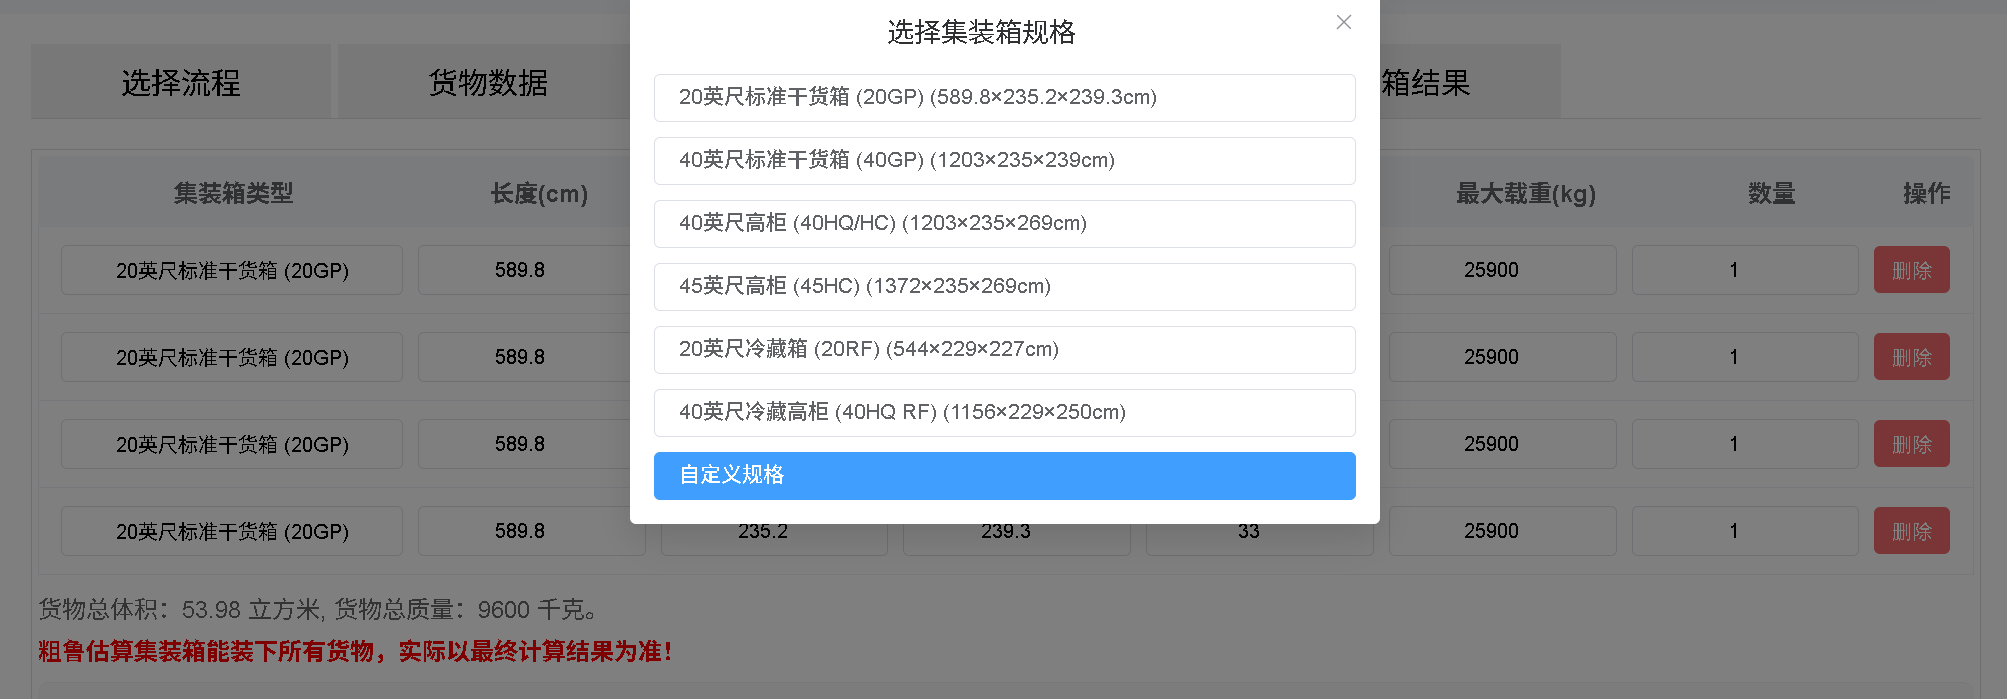
Container Selection
The system includes standard container sizes commonly used in international freight. If none fit your need, you can define a custom size (e.g., special containers, truck bodies).
# Max Payload: Maximum weight the container can hold. The software does NOT allow overloading — increase this value if you need to allow more weight.
# Quantity: Number of containers you plan to use. The system will load the cargo accordingly.
Container Dimension Adjustment: Built-in container dimensions are adjustable. You can fine-tune them for actual loading operations. To leave clearance gaps, simply reduce the corresponding dimensions.
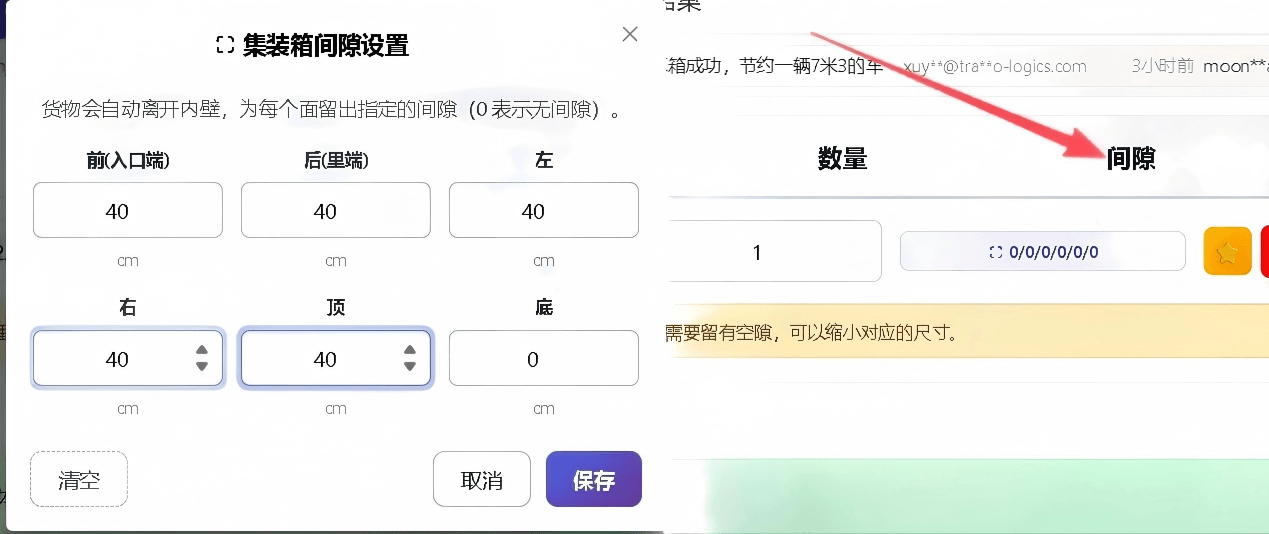
Gap Settings
On the container selection page, click the "Gap" column in the container list to open the "Container Clearance Settings" dialog. With gaps configured, cargo automatically stays away from the container walls with the specified clearance on each side (0 = no gap), making it easier for forklift handling and cargo loading.
How to Set Gaps
Effect After Setting Gaps
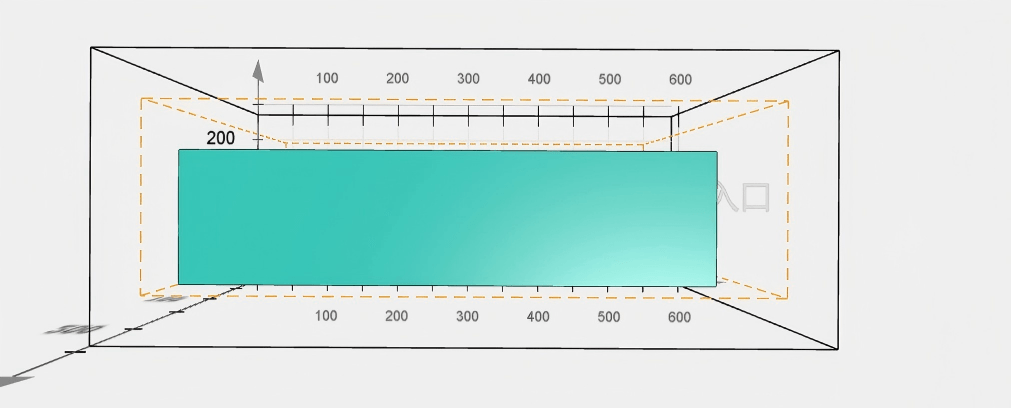
Gaps only leave clearance between cargo and the container walls — they do not change the actual cargo size. Overly large gaps may reduce space utilization, so set them based on your actual handling needs.
Pallet Types
This software supports multiple standard pallet types as well as custom pallet sizes.
Standard Pallet Types
| Pallet Type | Length (cm) | Width (cm) | Height (cm) | Max Payload (kg) |
|---|---|---|---|---|
| EPAL 1200×1000 | 120 | 100 | 15 | 1500 |
| EPAL 1200×800 | 120 | 80 | 15 | 1500 |
| CHEP 1200×1000 | 120 | 100 | 15 | 1500 |
| ISO 1140×1140 | 114 | 114 | 15 | 1500 |
| Asia 1100×1100 | 110 | 110 | 15 | 1500 |
Standard pallet height and max payload are based on international standards. Adjust according to actual cargo conditions.
Pallet Parameters
Parameter Description
Max Pallet Height
The maximum allowed height of a loaded pallet, including the pallet itself and cargo. Typically limited by warehouse door height or transport vehicle constraints.
Max Stacking Layers
The maximum number of pallet layers that can be stacked inside a container, limited by cargo bearing capacity and container height.
Pallet Load Limit
The maximum weight a single pallet can support. Exceeding this may cause damage or tipping.
Parameter Recommendations
- Max Pallet Height: Recommend ≤180cm for forklift operation
- Max Stacking Layers: Typically 2-3 layers, depending on stability
- Pallet Load Limit: Refer to manufacturer specifications
- Cargo Placement: Heavy items below, light items above; large items below, small items above
Proper pallet parameter settings improve space utilization while ensuring transport safety.
Custom Pallet
If standard pallet sizes don't meet your needs, you can define a custom pallet.
Custom Parameters
- Pallet Length: Custom length (cm)
- Pallet Width: Custom width (cm)
- Pallet Height: Custom pallet height (cm)
- Max Payload: Custom max weight (kg)
Example
For example, you can set a 120×120×15 square pallet for special cargo:
- Pallet Length: 120 cm
- Pallet Width: 120 cm
- Pallet Height: 15 cm
- Max Payload: 2000 kg
Custom pallet dimensions should be reasonable. The length-to-width ratio is recommended to be between 1:1 and 1.5:1.
Packing Plan Selection
Choose the appropriate cargo placement order based on your scenario:
Cargo Loading Order
| Algorithm | Description | Best For | Speed | Utilization |
|---|---|---|---|---|
| By Interface Order | Load in input order | Simple scenarios | Fast | Medium |
| Volume (Largest First) | Load large items first | Many large items | Fast | High |
| Volume (Smallest First) | Load small items first | Many small items | Fast | Lower |
| Weight (Heaviest First) | Load heavy items first | Many heavy items | Fast | Medium |
| Weight (Lightest First) | Load light items first | Many light items | Fast | Medium |
Container Usage Order
Choose the container usage order based on your scenario:
| Algorithm | Description | Best For | Cost Efficiency |
|---|---|---|---|
| By Interface Order | Use containers in input order | Simple scenarios | As listed |
| Volume (Largest First) | Use largest containers first | Many large items | High |
| Volume (Smallest First) | Use smallest containers first | Many small items | Low |
Cargo Placement Orientation
6 placement orientation options are available. Refer to the legend in the interface to understand each option, and choose the one that best fits your actual loading needs.
Different parameter configurations yield different packing results. Choose the configuration that best matches your actual requirements.
Cargo Stability Check
The "Cargo Stability Check" is a feature under "Safety Checks" in the packing configuration. When enabled, the system checks the contact area ratio between the bottom of each cargo item and its supporting surface (other cargo, pallet, or container floor). Only positions meeting the threshold will be accepted, preventing instability and shifting during transit.
When loading fragile items, high-center-of-gravity cargo (e.g., upright refrigerators, vertical racks), or goods for long sea voyages with multiple transshipments, enable this feature and set the threshold to 70%-80%. If certain items fail to find a compliant position, consider adding padding (cardboard, foam) between them to increase the contact area. Note: setting the threshold too high (e.g., 100%) may result in some items not being placeable, reducing overall space utilization.
Packing Results Overview
The 3D view provides an intuitive display of the loading plan, helping you understand the overall cargo arrangement.
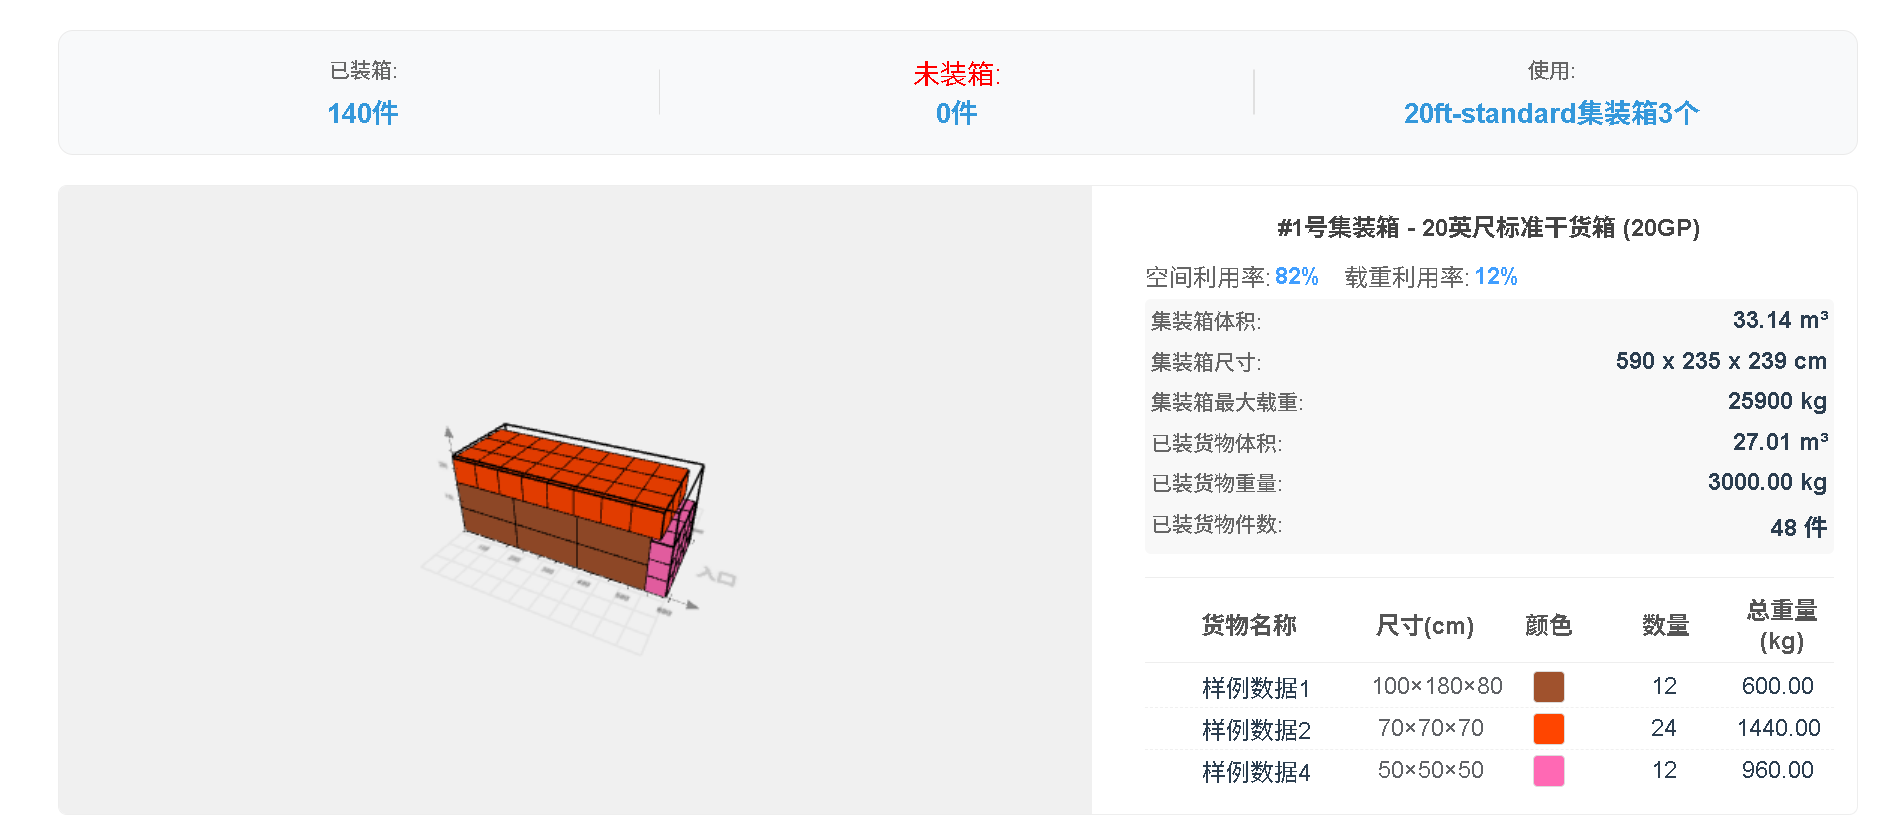
# Packed: Number of items successfully loaded into containers.
# Unpacked: Number of items that could not be loaded.
# Used: Actual number of containers used and which ones.
# Space Utilization: Total cargo volume / container volume × 100%. Higher means better space usage.
# Weight Utilization: Total cargo weight / container max payload × 100%. Higher means better weight usage.
Detailed Packing Steps
The 3D view, step-by-step animation, different camera angles, and coordinate positions show the actual placement of each item during the loading process.
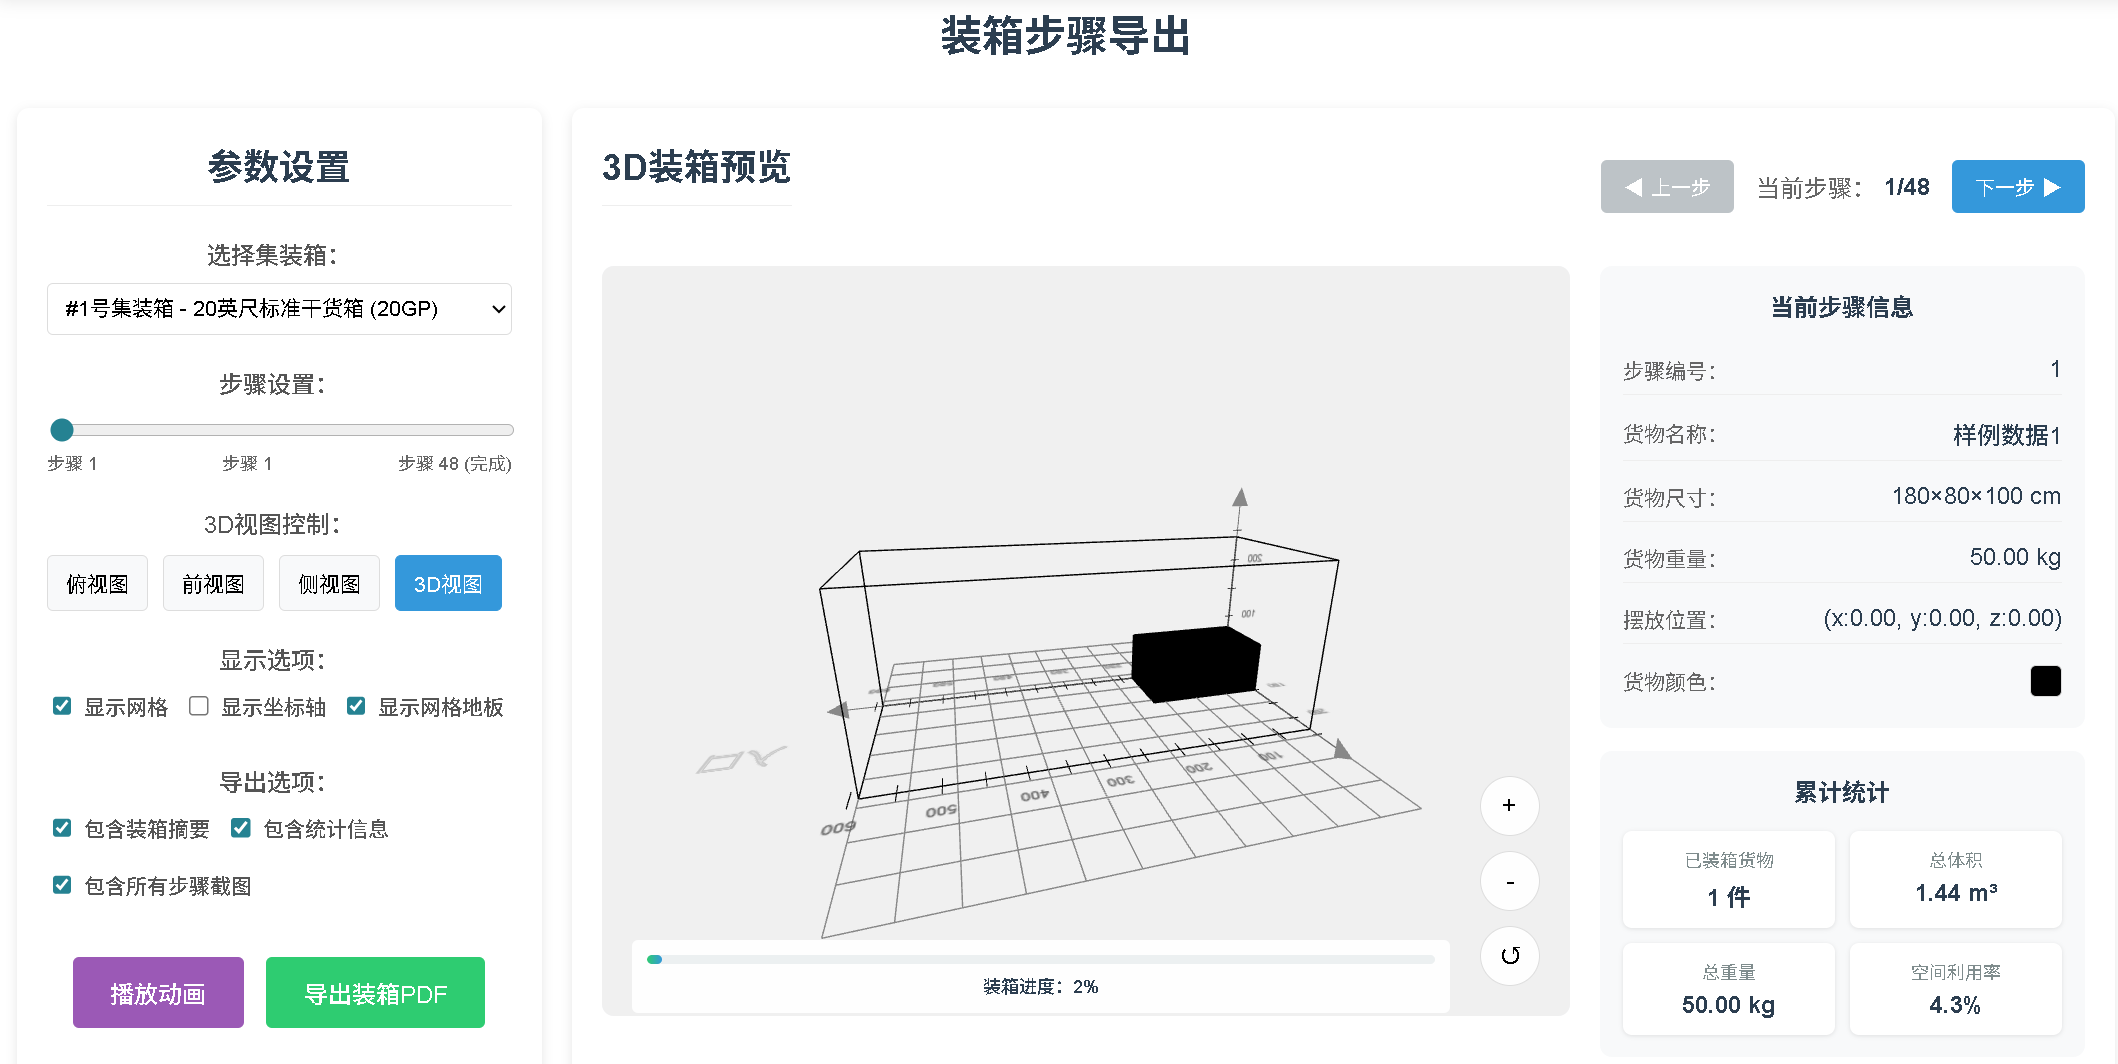
Export Packing Steps as PDF
Export a PDF showing each loading step with 3D visuals, making it easy to share with workers on the floor.
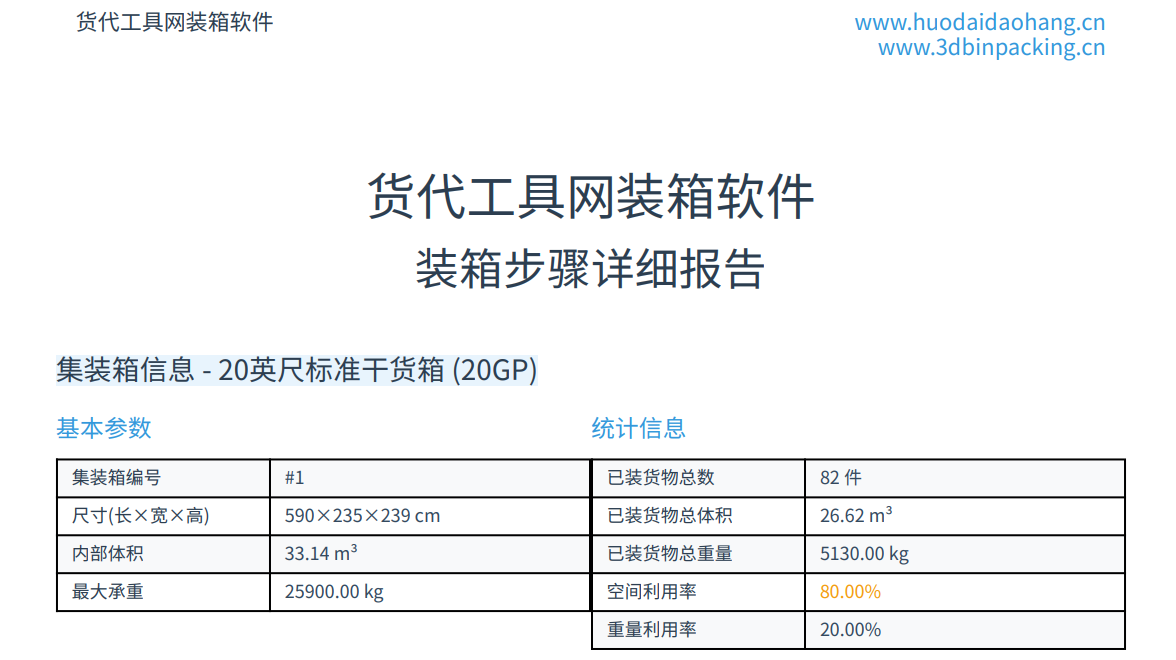
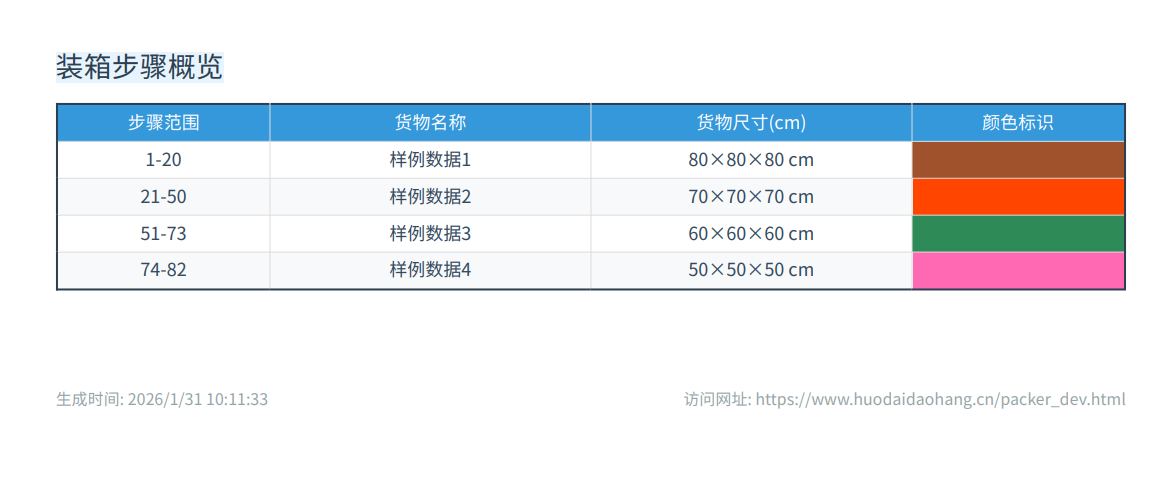
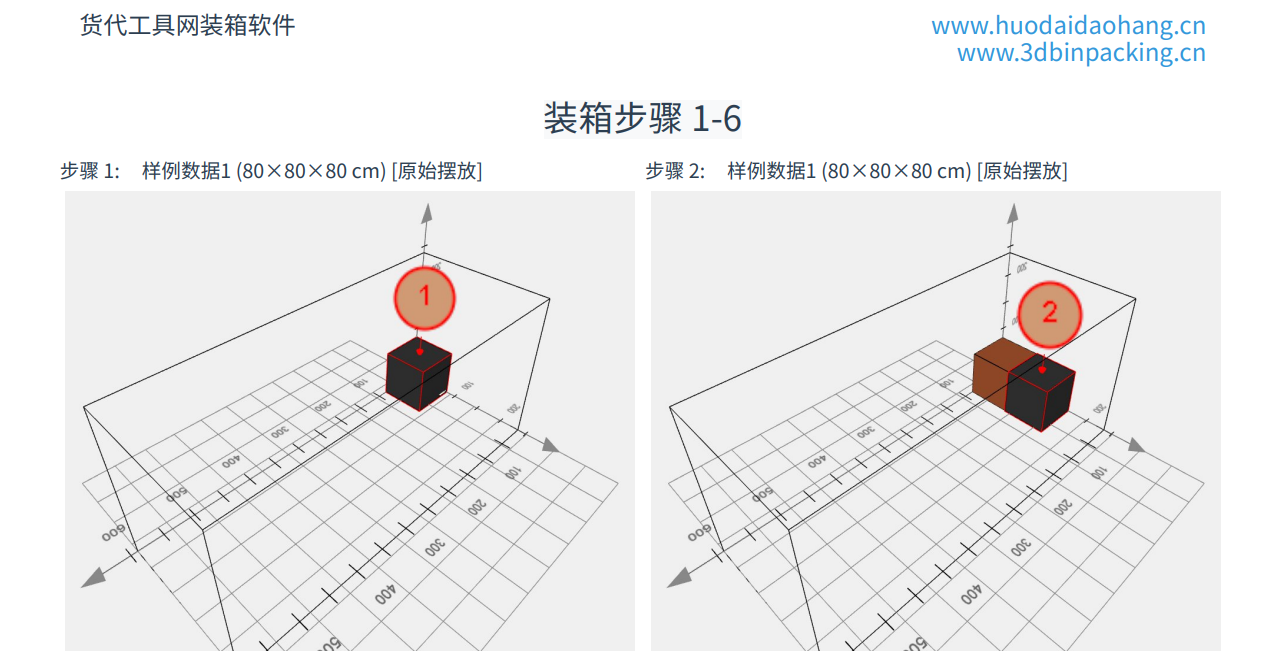
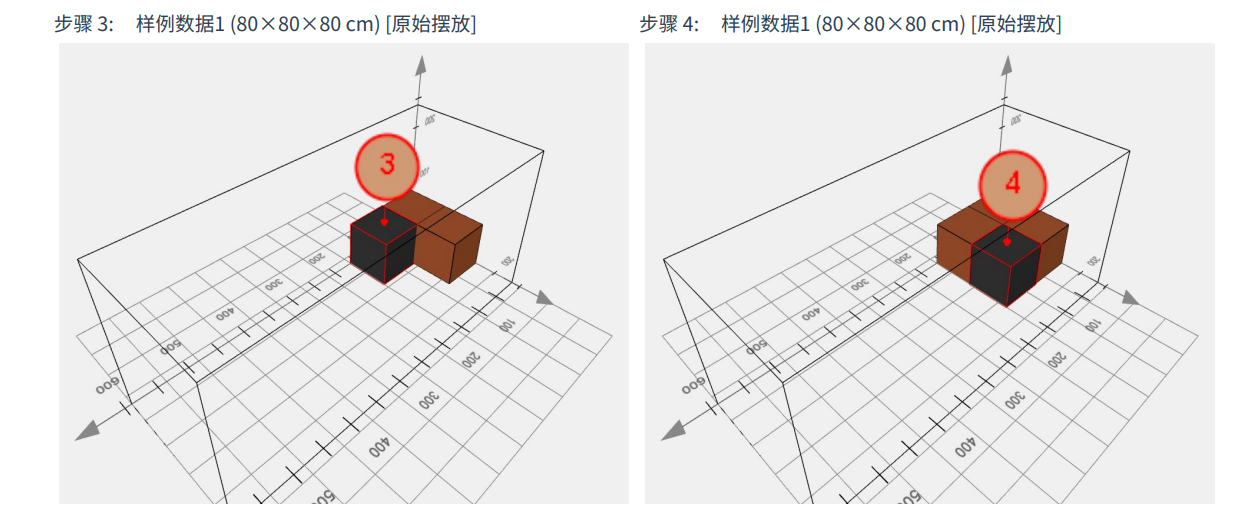
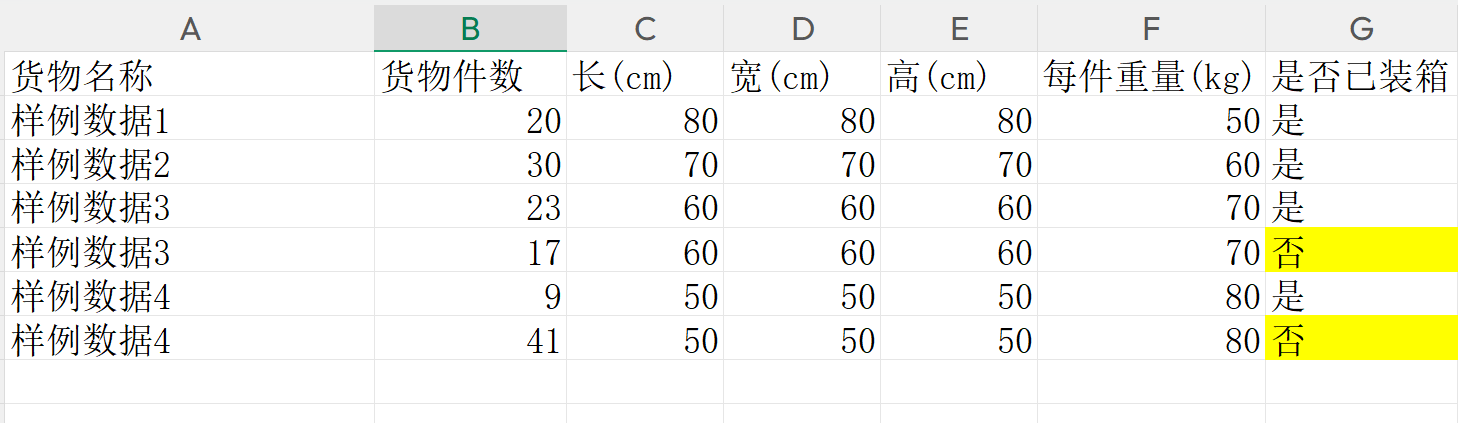
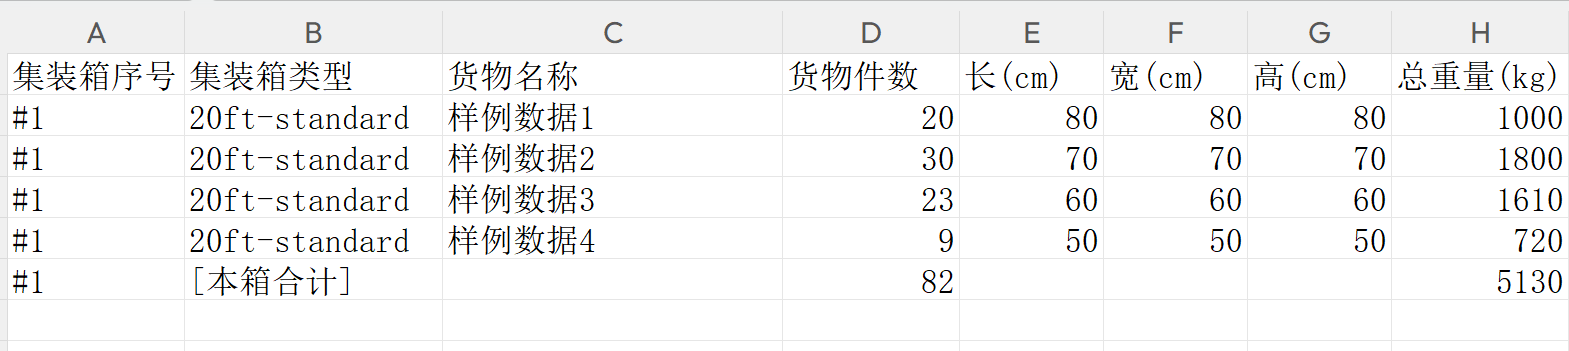
Export Packing Results to Excel
Export results as Excel files, with views from both cargo and container perspectives.
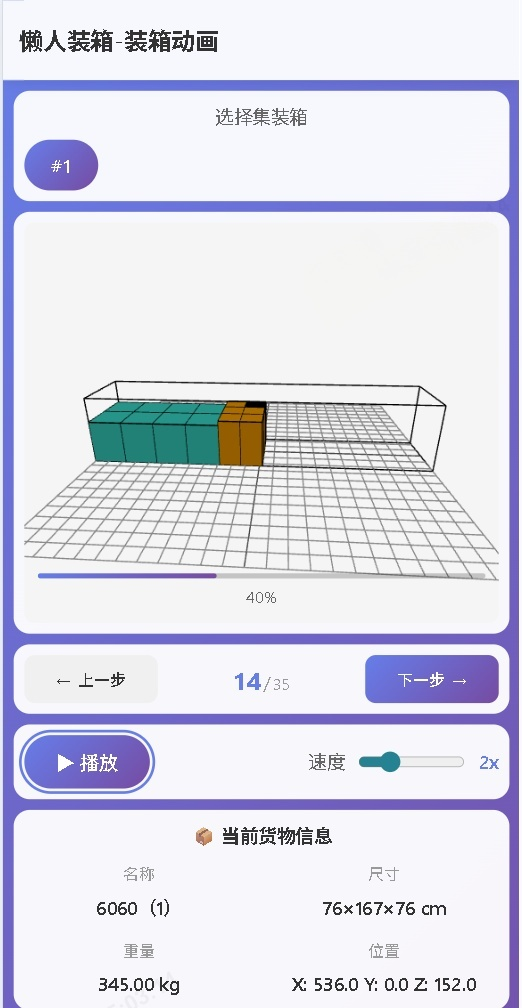
Online Sharing
Share the loading animation via link and QR code. Recipients can view the animation without logging in.

Manual Editing
If you're not fully satisfied with the automatic packing result, you can use the manual editing feature
After the automatic calculation, you can fine-tune the packing plan to meet special operational needs.
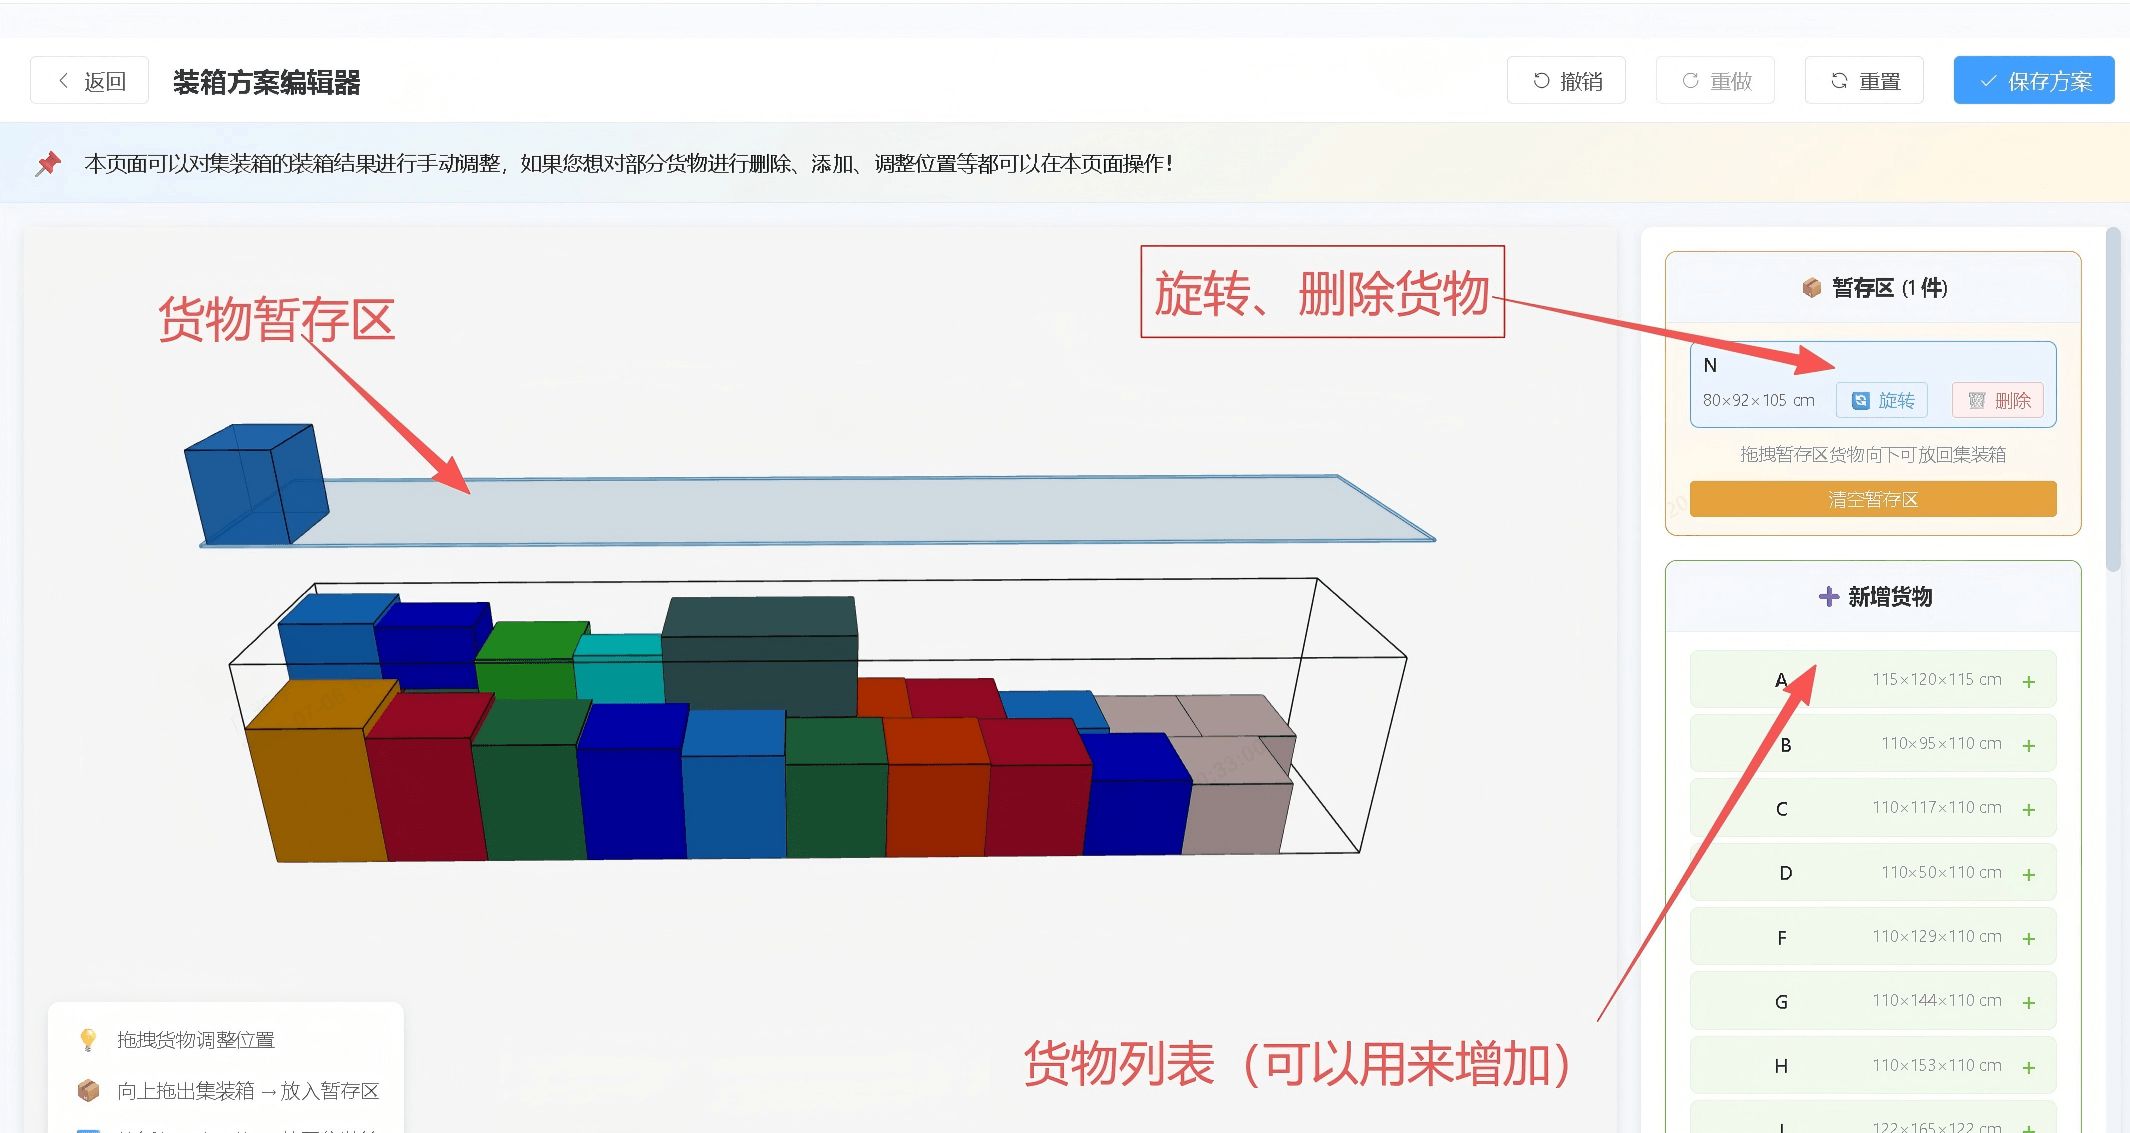
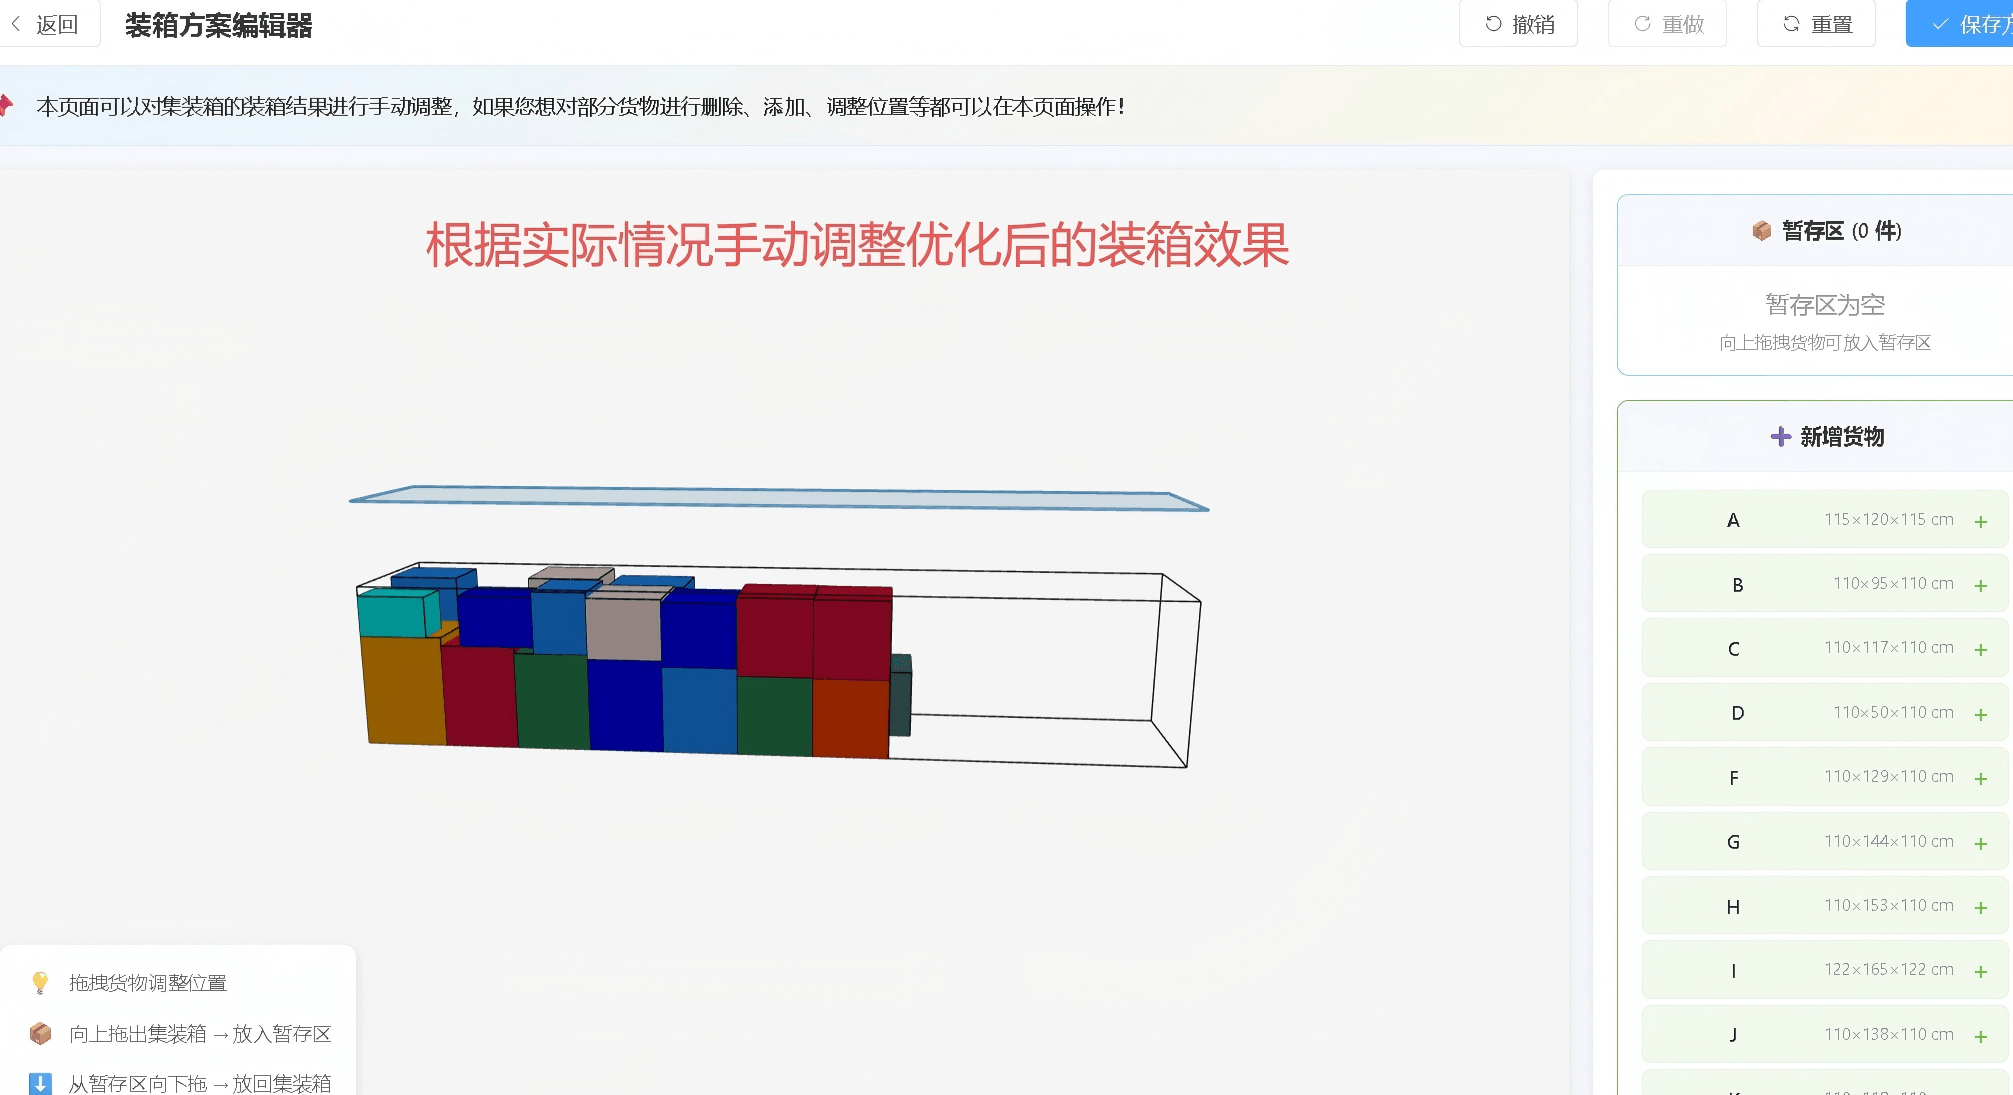
Manual editing is best for minor adjustments to the automatic result. For major changes, we recommend running a new calculation.
Adjust Packing Order
In the PDF export page, if you're not satisfied with the automatically calculated loading order (e.g., a cargo near the door is loaded first, blocking access), you can manually reorder the steps. The PDF will then reflect the new sequence.
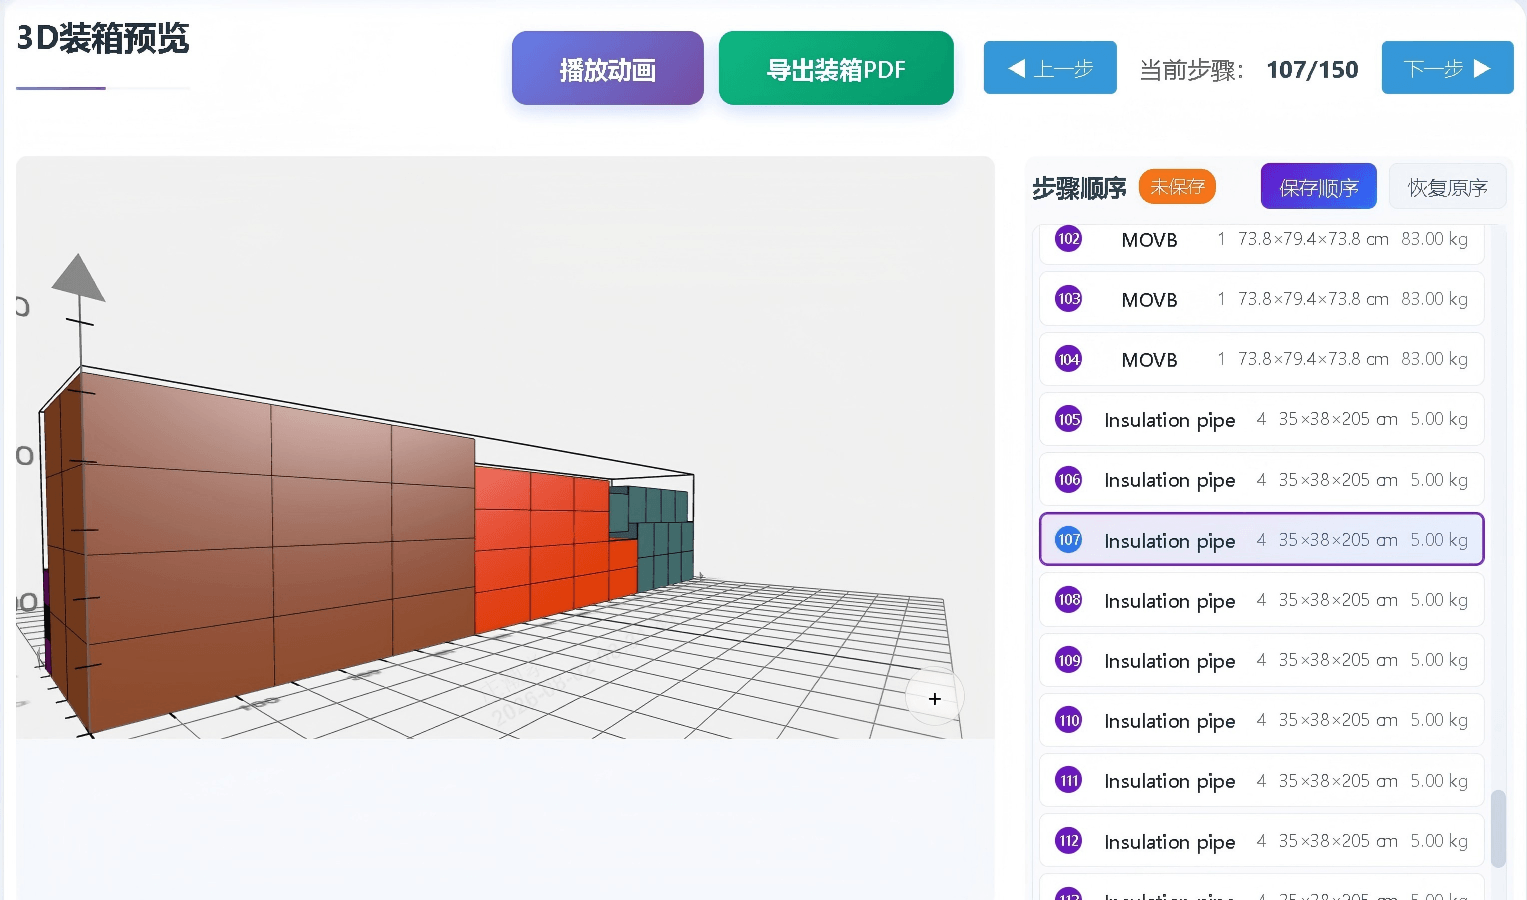
Typical scenario: The system calculates that a cargo near the door should be loaded first, but this blocks access for later items. Drag that item to the end of the list so it's loaded last — the PDF will then show the sequence in a way that matches actual loading operations.
Custom PDF Information
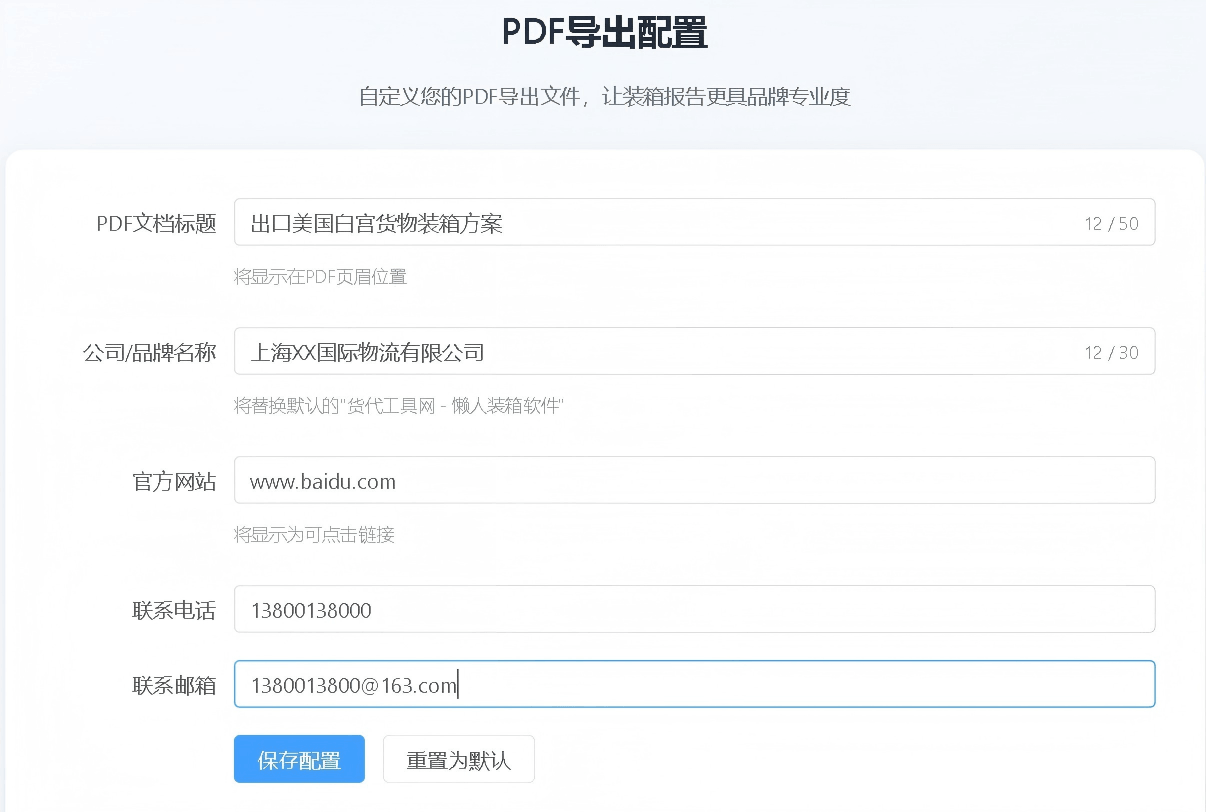
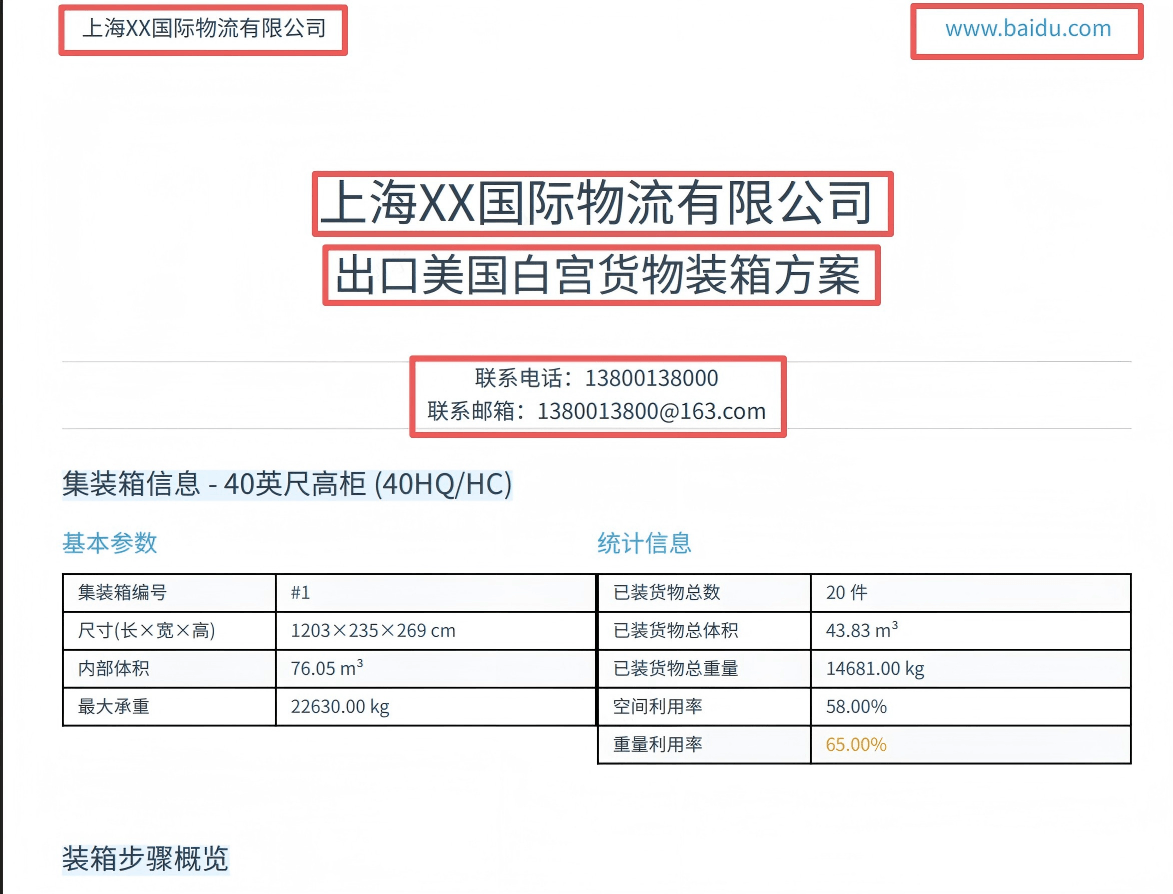
In "My Account" → "Settings" → "Custom PDF Info", you can configure company name, plan name, contact details, etc. This lets you present the packing calculation in a professional, branded format.
FAQ
Here are answers to frequently asked questions. If you have other questions, feel free to contact our customer service via WeChat.